Some special situations (or skip to the DIY section)
Here is a section about some special situations and special problems that you may have to handle.
As described above, the collimation with a laser collimator is quite sensitive to errors in centering the beam on the main mirror. Here is one way that lets you use the laser to get the accuracy of a Cheshire, as well as its insensitivity to centering errors. Besides, it will work even if there is no center hole in the mirror spot!
Put your laser collimator into a Barlow lens, and aim it at a wall, at a distance about the focal length of your mirror. You will see a much larger spot, perhaps not quite round, but if it is large enough to cover the main mirror spot, you are ready to go on ( if it is too small, try a shorter Barlow!).
You need to put a target over the lens end of the Barlow: Cut a circle of cardboa the Barlow: Cut a circle of cardboard, large enough to fit over the lens end of the Barlow, and make a center hole to let through the laser beam. A circledrawn the size of the main mirror spot will also help. Attach it to the Barlow (make it a tight fit to the lens cell, but make a tab to let you lift it off afterwards).
Do step 4 the usual way without the Barlow. For step 5, put the Barlow in the focuser and the laser in the Barlow. You should now see the wide return spot illuminate the target, and also the shadow of the main mirror spot. Now collimate the main mirror to center this shadow.
Collimating the main mirror without a center spot (step 5)
Some commercial telescopes come without a center spot on the main mirror. I recommend you make one, but if you do not want to, you could still get good collimation using a (preferrably double) crosshairs sight tube in step 4 and 5. After step 4, you have the main mirror centered in the sight tube. In step 5, you look for the reflection of the crosshairs (at night, you need to illuminate it with a flashlight), and adjust the main mirror to center the reflection by the (unreflected) cross.
The precision is n/p>
The precision is not as high as with a center spot, so do not skip the star check (step 7).
Collimating a rotating diagonal cage
A telescope with a rotating upper assembly gives freedom to place the eyepiece as conveniently as possible. However, if collimation should be maintained after rotation, the optical axis must coincide with the axis of rotation of the upper assembly - this complicates matters. Here is what I believe might work:
I think a laser collimator is indispensable. If necessary, do a coarse collimation up to step 4, and put the laser in place. Rotate the cage, and see how the spot moves - it should trace a circle somewhere on the main mirror. Tilt the secondary to make the spot stationary or almost so - it now shows where the axis of rotation hits the main mirror. Next you need to center it on the mirror spot by whatever means you can, such as adjusting the truss tube clamps, to fine-tune the tilt of the upper assembly.
Now that the axis of rotation is centered on the main mirror, you need to center the optical axis - both at the top of the tube and at the main mirror. You need a second marker for the center - a strip of thin plywood might work, if you screw it to the stationary part of the upper tube, across the center and as close to the secondary as possibleto the secondary as possible. Rotate the upper assembly again - the laser will trace out a circle on the strip. Draw it and mark its center, and temporarily remove the strip to drill a hole here (a little smaller than the laser spot). The tilt of the secondary is probably close enough, so don't alter it now, but you need to center the beam on the hole: sideways by shimming the focuser, and towards/away from the focuser by moving the secondary (adjusting the spider tensioning screws - if this can't be done, move it in/out of the tube instead).
Check step 3, and then by repeatedly tilting the mirror and moving it away or towards the focuser (steps 4 and 2 respectively), you should be able to aim the laser beam through the hole down to the center of the main mirror. You probably also need to fine-tune the "sideways" aim of the focuser by shimming it. Remove the strip again (until next time) and proceed as usual with step 5, tilting the main mirror (step 6 is not necessary - the optical axis is centered by now). (Thanks to Dwight Elvey of the ATM list for ideas)
Auto-collimating for wide-field photo
Using wide-field photo (with a coma-corrector), you need to ensure that the film track is accurately perpendicular taccurately perpendicular to the optical axis. This may work:
As with any auto-collimator, you need to get the collimation close with other tools. You may want to make a flat Cheshire to fit the film track of the open camera back - make a cardboard piece the right size, with a peephole at its center. Draw a circle, a bit larger than your main mirror spot, leave it white but paint the cardboard outside of it black.
To make a flat auto-collimator, take a piece of mirror glass, and cut it to fit the film track (I believe any good mirror is fine - you do not need first-surface optical quality. Bevel it after cutting!). Make a small, centered peephole in the aluminizing (I have made a mask of tape with a small hole, and polished away the aluminium with a little cerium oxide polishing agent).
To use, attach the coma corrector and camera (no film yet!). If you are not sure step 5 is perfect, put the flat Cheshire in the camera film track (circle on the side towards the tube). Illuminate it from the inside of the tube, and adjust the main mirror to center the spot in the circle. Then put in the autocollimating mirror instead, and peek through the hole. When correctly adjusted, you will see your own eye pupil in the peephole, infinitely magnified - that is, the auto-collimating mirror (seen reflected) will look quite dark. If not, try to tilt the camera.
I suggest you use a piece of dark PVC tape - it is less messy than paint. Cut to a circle of suitable diameter, not too small if you want to use a Cheshire or combination tube. 10-15 mm (1/2 inch) can be fine, or even larger to fit your Cheshire. If you cover a thin segment of the sticky side with another small piece of tape, you can easily peel it off, if you should ever need to.
To attach it, take two plastic rulers or strips with markings for the periphery and center. Make them into a cross and fasten the spot with a very small piece of tape in the very center corner. Then center the spot exactly by using the markings, and press down the spot to make it stick. Then remove the strips. Another trick is to make a paper circle the size of your mirror, fold it twice and cut off a piece at the folded corner, then unfold. If you ever consider using a laser collimator, make the spot with a center hole of at least 5 mm diameter (paper hole reinforcers are popular for this).
In step 3, if you want to use a laser collimator or crosshairs sight tube to center the secondary mirror, you need a very small spot on the secondary at the optical center). With a plain or combination sight tube, it is not needed.
One simple and popular design is a 35mm film can (most will fit a 1¼ in. focuser), with its bottom cut off and with a small hole. 1 - 2 mm (0.04-0.08 in.) will do, drilled or cut with a sharp knife through the center of the cap.
Find a piece of plastic or other suitable tubing that fits your focuser snugly without wobbling easily (I have used PVC tubing for electrical conduits and for drains, and aluminum tubes from old vacuum cleaners). Make a peephole cap from any material that you can make a nice hole in, that can be cemented to the tube end and is reasonably dark. Make a hole about 1 mm, centered as well as you can (if you find it too small, you can make it a little larger later). The length of the tube should be the inner diameter times the focal ratio: I have a tube with 28 mm inner diameter for my f/5.6 telescope, so I cut it to 28*5.6 = 157 mm length.
If the inside of the tube is shiny (you may put some glossy tape inside to make it shiny), you will see a bright reflection around the secondary/main mirror, separated from it by a thin, dark rim. This will let you center it accurately.
It is a good idea to put a few turns of tape around the outside of the tube, to prevent it from inadvertently hitting the secondary mirror with the focuser racked fully in.
If you have several telescopes of different focal ratios, you need one sight tube of the right length for each - no problem, they are easy to make. Why not make one of them a combination sight tube?
This simple sight tube can be enhanced in several ways:
If you put crosshairs at the inner end of a sight tube, they will help you center certain things along the line of sight: the secondary mirror (if the optical center is spotted), or the main mirror (particularly if you can't see its edge), or if you don't have a main mirror spot. You could use white thread (fairly thick, to be easily visible at a distance) glued to the rim of the tube.
If you use a pair of parallel threads instead of a single one, you will get a "double cross" with a clear square in the middle, and you can see the centered reflection unobscured - this is particularly useful for collimating without a main mirror center spot.
This is also simple to make - but why not make the more useful combination tube? The difference is just the length of the tube!
Start out as to make a simple sight tube of the right length for your focal ratio (if you just want to make the Cheshire, the length isn't important). Cut a "V" with 45 degree cuts of half the tube diameter near the peephole end. Cut a piece of cardboard to a half ellipse to fit inside the tube. Make a hole in its center (elliptical if you can). Make it narrower than your main mirror center spot, but if you want the combination tube, not so narrow that you can´t see the inner end of the tube through it! Cement it to the tube and cut away the excess. To get a clean edge to the bright face, you can make a field stop. A simple one can be made from a narrow ring of the same tube, with a piece cut away to let you put it inside the tube, and blackened. To compensate for a possible error 1B, the field stop should ideally be as far inside the focus as the peephole is outside it, but this is not critical.
On commercial Cheshire eyepieces, the bright face is often made of reflecting or semi-reflecting material. This can be helpful to see the faint reflections in the lenses when you collimate a refractor, but is hardly needed for a Newtonian.
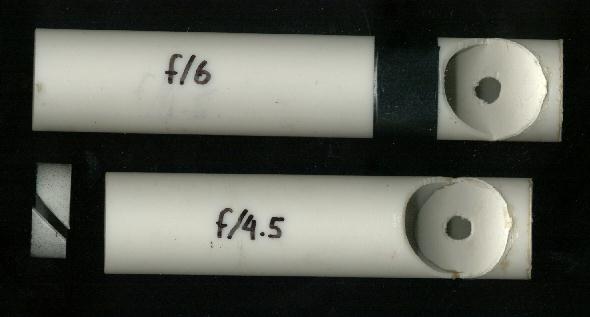
If you make your own Cheshire eyepiece and/or main mirror spot, you can make a field stop to act as a built-in tolerance gauge: Decide the acceptable error type 1A, and multiply it by 4 to get the difference in diameter between field stop and mirror spot. For a f/6 mirror, the strict tolerance is 0.77mm. The difference in diameter is 3.1 mm, so make the inner diameter of the field stop 3.1 mm larger (or the center spot 3.1 mm smaller, if that is easier), and the outer diameter to fit inside the tube. If you make the field stop of black cardboard, you can make two retaining rings (like the simple field stop above) to hold it in place.
Now, if you collimate step 5 and make the mirror spot appear fully inside the bright field of the Cheshire, you know that the 1A error is acceptably small, and you wilide the bright field of the Cheshire, you know that the 1A error is acceptably small, and you will have no trouble with coma.
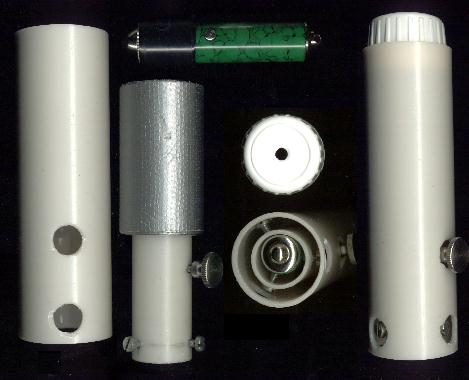
A laser collimator from a cheap keychain laser pointer
You can find other descriptions of laser collimators on the web, but here is how I made one - the precision is not great, but adequate. I used 2 pieces of plastic tubing, from electric conduit - the sizes, o.d. 20 mm and 32 mm (more like 31.7=1.25", actually), are what I happened to have handy.
Keychain laser pointers come cheap (I bought the one you see below in Greece). There may be laser hologram tops to make nice patterns, but the ones I got are too small to be of much use in collimating.
The inner tube holds the laser pointer with a little space between (about 1 mm). I put a few turns of tape near the output end of the laser pointer to hold it centered here, but not too firm to allow adjustment. At the back end, 3 small set screws (3 mm, or 1/8" if you prefer) in threaded holes allow accurate centering of the beam. A threaded hole sits right over the push-button and another screw in it turns on the beam. Normally, this is one with a large, protruding head, but when I adjust the beam alignment, I use a small, recessed screw instead.
Between the outer and middle tubes is tape along a large part of the length. There are holes for the set screws that are fully inside the outer tube and thus well protected. Another hole admi protected. Another hole admits the push-button screw - in normal use, I have one with a large head that I can turn from the outside.
To see the return beam, a "front" is needed, with a center hole to let out the laser beam. I found a white bottle cap that fit nicely, but cardboard would be fine. The length of the outer tube is not critical, but you may want to make it long enough to make the "front" visible from within the tube. To assemble the whole outfit, I just push fit the components, and add the screws.
Adjusting it is straightforward. I use the small screw to turn on the beam, and place the tube in a V block (actually, a corner in a bookshelf). When I turn the tube, the spot on the opposite wall traces a circle - I then adjust the 3 setscrews to keep the spot stationary. Last, I substitute the large screw to work the switch.
Here are the parts: at the top is the laser pointer with tape. >From left to right is the outer tube, the inner tube, the bottle cap above the complete collimator seen from the back end, and the collimator seen from the side. You can see I had to go almost to the limit of adjustment with this pointer!
Nils Olof Carlin - Back to the main page