French translation (grandmince.html) Traduction effectuie en Avril 2002 par Hugues Laroche. Toute erreur provenant de la traduction me serait naturellement imputable et peut m'jtre signalie directement ` l'adresse Hugues dot Laroche at ses-astra dot com ou ` Mel Bartels lui-mjme. Si tel itait le cas, veuillez par avance accepter toutes mes excuses.
Also see my more recent and detailed Joy of Mirror Making. And my meniscus mirror article and my 16 inch F3 meniscus mirror making class notes.
Astronomical objects being very far away are necessarily very faint. It takes a lot of reflecting mirror surface to gather enough photons to trigger beautiful images in our eyes. The thrill of seeing galaxies millions even billions of light years away in space and time impels amateurs to build large mirror telescopes from 16" to 40". Since thick glass is heavy and expensive, and the mount required to carry thick glass prohibitively massive, amateur glass pushers turn to thin mirrors. A large thin mirror dobsonian can be made for a very reasonable cost and is transportable to dark skies. There is a reason why long lines form behind these scopes at star parties - the views are incredible!
Gazing at incredibly distant galaxies using a mirror that you have ground yourself is immensely satisfying and joyful. In addition, a great deal of money will be saved: a finished 24" scope will set you back $7,000; grinding your own mirror and building the mount yourself will cost you $2,000. Amateurs have made mirrors up to 41" by hand. A grinding machine relieves the labor, but is not necessary. A 24" is the largest you can comfortably do solo. Larger mirrors require a helper.
The molecules thick aluminum coating on the face of the bowl shaped mirror is responsible for reflecting light up the tube to the eyepiece. Great care is taken to ensure that the face of the glass the metal coating is deposited on has a precise curve, accurate to several millionths of an inch. A carefully designed mirror mount holds the thin glass without distortion. Because many mirrors are supported in slings, we use an altazimuth mount.
What thickness to use? Many amateurs have successfully made large thin mirrors that are 1 5/8" to 2 1/8" thick. April 1996, Sky and Telescope magazine starting on page 75 carries an article by Toshimi Taki, analyzing mirror cell design to support thin mirrors. He concludes that thin mirrors are most affected by sagging between the support points. Taki states that we can go up to approximately 30" diameter for 2" thick glass using 18 pt flotation support without excessive sagging.
Having made a dozen mirrors of 16" to 30" in size, it is my suggestion that 2" thick pyrex glass is significantly easier to work with than thinner pyrex glass. In particular, there is much less concern for astigmatism during fine grinding, and flexing of the mirror at the polishing tool's edge during figuring is a great deal less.
I recommend pyrex #7740 fine annealed glass, or, if you are willing to work very hard at avoiding astigmatism, and can find glass of known pedigree, I also recommend 1" thick plate glass.
When I first started my big mirror career in 1980, glass came 16 sided on the edge, with deep ripples on the face and back. A lot of work went into preparing the mirror for initial grinding! I had to setup a tool to grind the edge round, put bevels on the front and back, grind the back flat, then grind the front flat without creating a lot of wedge (difference in thickness around the rim of the mirror). Now, the glass comes beautifully round, the back reasonably flat, no wedge, and with the curve already generated into the face of the mirror. I recommend the pregenerated curve because it saves a great deal of time and mess, though it does cost more.
A good size to start is 16" to 20".
Now, one could use thinner glass, one could use coarse annealed glass, one could use plate glass of unknown origin, and one could start with a larger diameter mirror. You will probably succeed, but the chance of failure exists. Your goal as a starting big mirror grinder is to successfully complete a mirror with a fine figure, not to push the envelope of what's possible. I suggest either a 16" to 20" pyrex fine annealed 2" blank, or, if you guard against astigmatism fanatically and select a focal ratio slower than f/5, a 16" plate glass blank 1" thick of known annealing.
If you are brave and wish to push the envelope, here are some of the thinnest mirrors that I have made successfully
12" diameter x 3/8" center thickness, f/4, plate glass
16" diameter x 5/8" center thickness, f/5, plate glass
20" diameter x 1" center thickness, f/4, fine annealed pyrex
24" diameter x 1" center thickness, f/5, fine annealed pyrex
30" diameter x 1 1/4" center thickness, f/4, fine annealed pyrex
All of these mirrors performed beautifully. Still, when all is said and done, the easiest large mirror I have ever made is my current mirror, a 20" diameter x 2" edge thickness, f/5, fine annealed pyrex. See my 20 inch mirror log.
Longer focal ratios are easier to figure but call for longer tubes. The larger the mirror, the more you must compromise on the focal ratio. A 16" f/6 or f/7 is not out of the question, but a 30" is going to have to be f/4 to f/5. 2" ParrCorr coma correctors help greatly for f/5 scopes and faster. Combined with wide angle low power eyepieces such as the 35mm PanOptic, the ParrCorr produces beautiful rich field images. For most glass pushers and observers, f/5 is the best compromise.
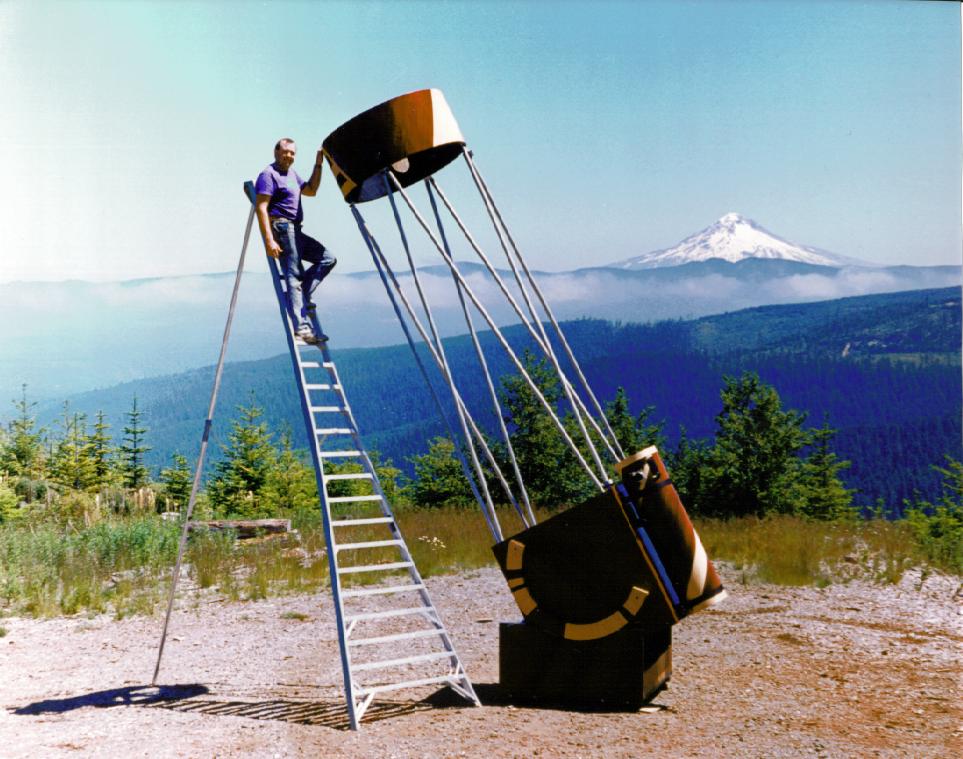
Steve Swayze's beautiful 40" f/5 x 2"
Let me cut to the quick: your goal will be to produce a mirror that is practically indistinguishable from perfect. Even first time large thin mirror grinders, if they methodically and patiently follow the techniques outlined, have a strong chance of obtaining a good result, even outstanding result. Not only is a very good outcome achievable, but if you allow noticeable errors in the mirror's figure, chances are that the errors will be worse than you think they are, and, when large mirrors are bad, they fail miserably!
Let me also hasten to add that I will not get into an endless discussion of wavefront error, Strehl ratios, RMS error, and what error at what extent over what surface area is acceptable or not acceptable.
We, as large thin mirror makers, care principally about the quality of the view through through the eyepiece. We will verify our mirror's quality at the eyepiece using the star test, after first getting the mirror close with easily understood tests such as the matching Ronchi, Foucault, and Caustic tests.
Amateur large thin mirrors can be rated by the magnification that the image breaks down at. As the magnification is increased from very low upward, at some point the image will fail. Stars will no longer look like pinpoints, planetary detail will be indistinct, and the overall impression disappointing. Unfortunately, unless the mirror is very bad, on many nights the atmosphere will limit the test, but over several nights we can get a good feel for the magnification that the image breaks down at.
Mirrors that can sustain 35x to 50x per inch of aperture I rate as excellent.
Mirrors that sustain 25x to 35x per inch of aperture I rate as good.
Mirrors that sustain 25x per inch of aperture are acceptable.
Mirrors that sustain 15x to 25x per inch of aperture are poor, usable only at lower powers.
Mirrors that fail at 12x per inch of aperture are plain just not finished.
For smaller mirrors, push these numbers a little higher, for gargantuan mirrors, push the numbers a little lower.
Here are Bratislav Curcic's comments on using the star test to judge optical quality:
1. Can't find anything wrong with it, absolutely perfect: 'expletive' Yet to see one after ~25 yrs
2. Defects visible only in extrafocal images, and only after extensive star testing in best seeing conditions (1/10 wf): You lucky b@$#@rd! Can count these on fingers of one hand
3. Extrafocal defects readily visible, but really minor (1/10 wf): 'Excellent' Best examples of best commercial telescopes (Zeiss, AP, Tak, etc) Best examples of homemade optics
4. Extrafocal defects fairly obvious, but in focus image still essentially perfect (1/10 - 1/6 wf): 'Very good' Majority of current 'best commercial telescopes'; best examples of mass produced scopes
5. Large defects visible on extrafocal images, in focus image suffers only slightly (1/6 - 1/4 wf): 'Good' selected examples of mass produced telescopes, most well made amateur optics; some examples of 'best commercial scopes' can still be found here
6. In focus image visibly suffers (~1/4 wf): 'Acceptable' good mass produced scope, most good large/fast mirrors I've seen
7. Image deterioration serious, clearly beyond 1/4 wavefront: 'Light bucket' majority of older generation mass produced scopes, special purpose telescopes (astrographs)
8. It's difficult to determine when scope is in focus at all (1/2 - 1 wf): 'If you're happy with it ...' unfortunately, not that difficult to find !
9. Usable only at very low magnification (~1 wf): 'I don't want to have anything to do with this one'
10. Absolutely useles: 'expletive' unlike 1, I've seen these :-)
99% of all scopes I've seen fall into '4-10' bracket.
Throw rough grit around the rim of the mirror, wet it down, grab a piece of metal, and grind in a nice rounded bevel 1/12" wide. Do this for the back side of the mirror also. As grinding proceeds, maintain the bevel.
Scrounge a flat piece of glass 1/2 the mirror's diameter or more by 1" thick, or a very flat piece of metal of same size, and proceed to grind the back flat, using 80 grit then 220 grit. Even if the back looks flat, most of the time is really isn't, and grinding to 220 grit is our way of ensuring that the back is truly regular. The back does not have to be absolutely flat, but it does need an even curve with no low or high spots. An uneven back means that areas of thinner glass sag more during grinding and polishing, causing astigmatism.
When using 220 grit or finer, the bottom piece should always be floated and rotated. Otherwise the bottom piece will flex, causing an irregular curve to be ground into it. 1/2" of newspapers, or an old sheet folded, or outdoor carpet with thousands of little green plastic blades will do. At 220 grit, rotate the bottom piece every 20 minutes about 1/4 to 1/3 of a turn, varying the amount of rotation a little bit each time. At finer grits, rotate every 5 to 10 minutes.
Tools from 50% to 100% the mirror's diameter will work fine without special regard. I like to use tools that are 75% the mirror size. The tool is lighter and easier to handle, and still grinds fast enough. Plaster tools over 20" in size are heavy and awkward to handle. Make a grinding tool from finishing plaster, hydraulic cement, casting plaster, or concrete, available at well equipped building supply houses. Cover the face of the mirror with plastic wrap. Build a dam on the mirror's face from cardboard 1 1/2" to 2" high. Mix the plaster together with water in a bucket and pour into the mold. The plaster will set quickly. In a few hours you can remove the tool from the mirror, and set it on edge to dry. Several amateurs have found that placing glass fiber cloth, or steel mesh, into the plaster significantly strengthens the plaster tool. Tiles can be directly embedded into the plaster by placing them in their webbing on the mirror face, then pouring the plaster in around and on top of them.
I like finishing plaster available in large 90 pound sacks for $12. Dental hydrostone is also highly recommended, also orthodontic plaster. Also consider a USGypsum product called Tufstone available from sculpture shops. I have also used concrete successfully. Finally, I've used wood tools built from layers of plywood up through 12 inches in size.
A couple of days later the tool ought to feel dry to the touch. If not, give it more time to dry.
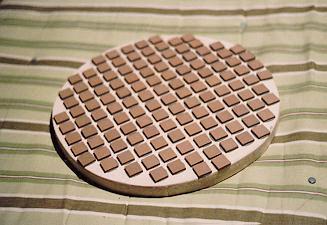
Traditionally we use unglazed bathroom ceramic tiles, 1" square, to populate the face of the tool. The latest suggestion from the atm list on the internet is to use large metal washers since these grind faster. Only use the metal washers on pre-curved tools. Cover the face of the tool with slow curing epoxy or resin, and arrange the tiles or washers. The tiles can stay attached to their paper backing so that you can lay down a square foot at a time. Don't worry if the epoxy squishes out and fills the channels. Use an old skilsaw blade and protective glasses and pass the saw over the channels. The epoxy comes right out. You can also use this to renew channels if the tiles should become worn down too much. Lay a piece of plastic over the top and place the mirror face down over the tool to help form the tiles or washers to the mirror's curve. Let this dry for a couple of days.
Here is a tiled plaster grinding tool suitable for mirrors up to 30":
If you had your blank pregenerated, you can skip this step. Otherwise prepare for a loud and messy job roughing in the curve! Grab a metal ring tool of half the mirror diameter. Metal pulleys or pipe floor flanges can be used. Grind with long strokes that overhang the edge by an inch and that are slightly off center. This is about four times faster than roughing in the curve with a tiled tool. If using a tiled tool, you may grind through the layer of tiles before reaching the desired focal ratio. If so, just glue on another layer of tiles. Start with the mirror on top and spread the roughest meanest looking grit you can get your hands on. 30-60 grit is not too large. Sand blasting grit is cheap, but breaks down quickly. Concentrate the mirror's center over the tool's edge. Take a half dozen long strokes, then step to your right, spin the mirror clockwise, and start the next half dozen strokes. Remember to keep the mirror center over the edge of the tool. Renew the grit with water from a spray bottle. Eventually the grit breaks down into mud and you must stop and add more grit. When the mud builds up too much, stop and wash the tool in the backyard with a garden hose. The harder you work, the faster you can get through this. It is noisy! I suggest working outside, or in a tool shed, or in a carport.
Depth to grind the center of the mirror to is found from: mirror diameter * mirror diameter / (16 * focal length). The depth is called the sagitta, and here is the depth to grind for f/5 mirrors:
Mirror Dia - Sagitta (inches)
16 0.2
18 0.225
20 0.25
22 0.275
24 0.3
26 0.325
28 0.35
30 0.375
32 0.4
34 0.425
36 0.45
38 0.475
40 0.5
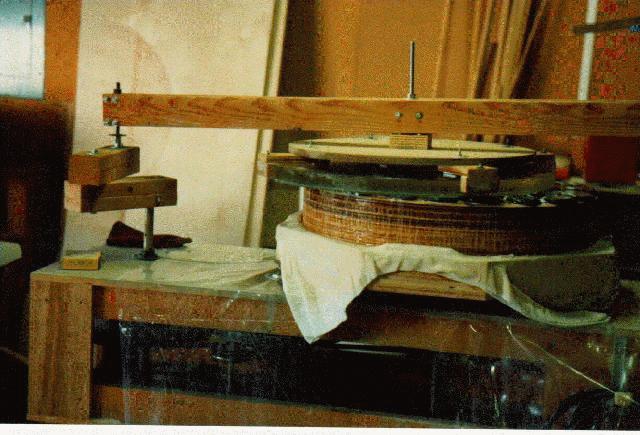
To measure the sagitta, I grabbed an old carpenter's bubble level, sawed off the end of a surplus micrometer that I picked up for nothing, and bolted the micrometer to the center of the level. In a pinch you can use dimes which are a hair over 0.05" thick. Put a straight edge across the mirror face and count the dimes you can squeeze under it at the middle of the mirror.
When you reach 2/3 of the desired depth, flip the mirror face up. You will see that the edge of the mirror has hardly been touched. Put the tool on top, and use 1/2 'W' pattern strokes. If the mirror is a 20", then the stroke length is 10". 'W' strokes start a little to once side of the mirror center, and end a little to the other side of the center. About a half dozen push and pulls constitude a 'W'. At the end of the 'W' pattern, spin the upper piece clockwise and take a step to your right (counter clockwise). These strokes will extend the curve out to the edge and continue to deepen the mirror center. If desired depth is reached too soon, use very wide long strokes to extend the curve without deepending the mirror center.
Wash the mirror and tool with a garden hose, using a brush to get the grit out inbetween the tiles, and thoroughly clean the work area. Go onto 120 sized silicon carbide grit. Grind for a couple of hours with tool on top using 1/3 W strokes.
We will use three grit sizes for fine grinding. We will finish with high quality 9 micron aluminum oxide, using 500 grit silicon carbide 25 micron in size for our middle stage, and 220 grit silicon carbide for our initial stage. It is not necessary to hit every grit size: 220, 300, 400, 500, 600, 12 micron, 9 micron, and so forth. The difference in particle size between 400 grit and 500 grit is barely noticeable. The sharp pointed edges of the silicon carbide particles chip away the glass as the tumble between mirror and tool. The glass sustains fracture damage to a depth of three times the grit size.
Almost all of fine grinding is done with the tool on top (TOP). Remember to float the mirror on newspapers, or an old blanket folded up, or outdoor carpet. Rotate the mirror a 1/3 turn every 10 minutes. Use 1/3 'W' strokes if the tool is the same size as the mirror and use 1/2 'W' strokes if the tool is 3/4 size. When the grinding noise becomes quiet, add new grit and continue.
We choose 220 grit to start because the grinding particles are small enough to move onto 500 grit for our next stage, yet the particles are big enough to grind the tiles to shape if starting with a pregenerated blank, or to remove the 120 grit pits if rough grinding by hand. When the majority of tiles have come into contact, and 120 grit pits are gone, we can clean up and go onto 500 grit. Count on 2 hrs to 8 hrs with 220 grit.
500 grit will take 2 hrs to 6 hrs depending on mirror and tool size. The tool should glide back and forth evenly with no sticky points. Swirl the tool every so often to spread the grit so that the larger grit doesn't congregate in the center of the mirror. Note the placement of a few of the largest pits left from 220 grit. Use a magnifying lens and make sure that there is no trace remaining of these pits before finishing 500 grit. Inspect the surface with a focused flashlight beam and magnifying lens and assure yourself that no abnormally large pits remain. Clean the tool with a brush to get all the grit out from between the tiles.
I strongly recommend MicroGrit's 9 micron WCA-9T. This is dry white colored precision lapping aluminum oxide with suspension treatment. The particle size is tight: that is, there are very few particles larger than 12 micron. Average quality 9 micron grit has significant particle counts at 20 micron! Polishing time is cut in half by using MicroGrit. Polishing large mirrors by hand is arduous: anything we can do to cut down on polishing time is well worth the trouble. In addition, large pits that might escape detection with average quality 9 micron are easy to see after fine grinding with MicroGrit. These larger pits are notorious because they often don't show until polishing is well underway, since they don't stand out until the smaller pits are polished out. We stop at 9 micron because the danger of scratches and the tool sticking is much higher with 5 micron and 3 micron grit. In addition, even MicroGrit 5 micron contain particles as large as 9 microns, so polishing time is not much less.
Mix the MicroGrit with water ahead of time. Mist the dry clean mirror face and pour a little fingernail size amount of MicroGrit onto the surface. Using your very clean fingers, spread it around the mirror face. Mist the dry clean tool and carefully place it onto the mirror. Hold up the tool at its edges so that no weight presses on the mirror, and gingerly move the tool slowly around the mirror for a dozen strokes or more. If you hear the slightest 'scritch' sound, stop immediately, clean everything, and try again. After a dozen strokes the tool will start to slide on the mirror with a nice even friction. Push the tool around with a slower even speed, using elliptical 'W' strokes to round off the ends of the strokes. Keep the tool in constant motion. Every so often add a light mist from the water spray bottle. After 10 to 20 minutes, the grinding compound will exhaust itself and thin out. If you persist, the chance of creating a bad scratch or sticking is high. Clean mirror and tool and recharge. 9 micron will take you 2 hrs to 8 hrs depending on tool and mirror size. The mirror will reflect light at a low angle of graze. Sit it on the table and put your eye just above the mirror edge and a couple of feet back. The reflected image on the mirror should look of even brightness. Any scratches will be easy to see as you spin a third the mirror a third of a turn and look again. Inspect the entire surface with a magnifying lens and focused flashlight beam, looking for pits. Set aside the tool in case a polishing disaster occurs and you need to come back to fine grinding.
Make a polishing tool from plaster like we did for fine grinding of at least 1/2 the mirror diameter. Let it dry thoroughly, and seal with water sealer or something similar. By using a tool of this size, we avoid astigmatism, and produce a zone free surface, absent of roughness so typical of small tools.
An alternative to the plaster took that I like is a full sized polishing tool made from 6 layers of 3/4" plywood, sealed with epoxy, with a couple layers of doorskin on the top to approximate a convex curve. It is important that the pitch be of equal thickness across the face of the tool. Polishing is MOT (mirror on top). Drag is a little heavier, but controlling scratches is easier.
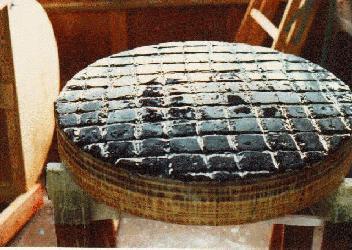
I place a duct tape dam sticking up a couple of inches around the rim of the face up tool. I heat the pitch in an old clean pot that will never be used for anything else. Spread aluminum foil around the burner and on the stove and floor. Spilled pitch is time consuming to get up. Heat the pitch slowly and don't allow it to boil. When the pitch has melted, pour it on the tool to a depth of 1/4". When the pitch thins to 1/8" thick, it acts harder. If the pitch is 1/2" thick, it acts softer. Wait a minute or two, then pour a little more directly on the center so as to form a slight hump. Use a stick to push pitch towards the center as it cools. Wet a piece of aluminum or wood with water and dishwashing soap such as Ivory or Dawn, and press in criss-crossing channels into the pitch with a spacing of 1" to 2", as soon as the pitch as cooled enough. Immediately wet the surface of the pitch with water and soap, do the same to the mirror, and lower the mirror onto the tool. Move the mirror around a bit, and some of the pitch squares will make contact. Wet the back of the mirror to see through the mirror. Lean on the mirror to try and bring as many pitch squares into contact as necessary. After a few minutes, the pitch will have cooled and no further progress can be made. Pull the mirror off, clean it up and set it aside. Soak the pitch with water and chip away any high spots where too much pitch has congregated. Make a new duct tape dam, heat a pot of water to boiling, pour into the dam, and let the water heat up the pitch for several minutes. Strip away the dam and let the water run off. Immediately water and soap the pitch, reform channels that have closed, and press the mirror again. This time almost all of the pitch squares will come into some sort of contact. If necessary, repeat this once more. Once the lap is in reasonable contact with the mirror, run cold water over the lap for a couple of minutes to solidify its shape, and microfacet its surface by running an X-Acto knife blade up and down and side to side across the lap with �" spacing. Add pre-mixed with water polishing compound and begin polishing. The mirror and tool will quickly come to equilibrium.
Here is a full sized polishing lap for a 30":
We have but one goal in polishing - to remove the pits left over from fine grinding. A single star test, or Foucault test, or Ronchi test, is permitted an hour or two into polishing to ascertain that astigmatism is absent. The more we concentrate on polishing the mirror, and not figuring the mirror, the better off we will be. Apparently, during polishing, the platelet shaped polishing particles embed themselves into the pitch, forming a layer that scrapes the glass on a very fine scale.
Remember to rotate the mirror every 5 to 10 minutes. Use heavy, slow, deliberate strokes. Plan on 1/2 hr to 1 hr per evening for two weeks to complete polishing. This is arduous labor!
Scratches during polishing come from: scratches already present from fine grinding but impossible to notice until the glass is semi-polished, poor polishing compound containing contaminants and overly large sized particles, dust in the air that settles on the mirror, and tiny particles that flake off the tool. When MOT, the offending particle sinks into the pitch instead of gouging the mirror until the particle breaks apart. Duct tape the edge of a plaster tool to prevent plaster from flaking off.
Using consistent sized MicroGrit for the last stage in fine grinding will speed up polishing. Using top quality polishing compound and pitch will also reduce polish time. I use Lensmax-B or Lensmax-R. This is consistent sized cerium oxide, and mixed with 4 parts water, will cut fast. Polish time is directly proportional to the energy you put into it. So, push slow and hard. The largest tools will be heavy enough that you will just want to push them back and forth. The glass and pitch should be warm to the touch after several minutes. Don't worry about the curve, don't try and figure the mirror. We will completely change our technique when it is time to smooth the surface and start figuring. I like Gugolz pitch. It is a black colored pitch with no particulate impurities, and is malleable over a wider range of temperature than other pitches. I like #55 for the colder climate in Oregon. Those in warmer climes will choose #64, and tropical people will want #73.
A polishing stroke should last a couple of seconds up and a couple of seconds back. Use a 1/3 ''W' stroke, or 1/2 'W' stroke if a smaller tool. Vary the strokes slightly to avoid digging zones into the mirror at the end points of the strokes. Try to polish as long as you can before your muscles give out. You can stop for a couple of minutes if you move the mirror around every 1/2 minute or so. When the polishing generates heavy drag, resist the temptation to immediately add new polishing compound, and instead, add a touch of mist water from a spray bottle, and stretch out the polishing for a few more minutes. Polishing is most efficient when you feel a strong heavy consistent drag. If the polishing binds and skids, slow down the speed of the strokes and dig in harder. When done for the evening, place the tool face up, wet it down with water and polishing compound with a touch of soap, and cover with plastic wrap. The next day, warm the pitch for a couple of minutes and press the mirror until test strokes reveal a smooth even contact. You can warm the pitch using the duct tape dam and warm water, or use a heat lamp, or sit the pitch lap out in the sun for several minutes.
An initial shine typically starts in the center of the mirror and quickly works it way out to the edge. If the edge looks completely unpolished after several hours, then fine grinding went wrong and we must return to 9 micron or possibly 500 grit, inspect our technique to uncover our error, and fine grind the mirror to a better sphere. The next stage to look for is the disappearance of surface haze to the unaided-eye. From a few feet away, the mirror looks absolutely beautiful, but using a magnifying lens and focused light, we see that an incredible number of very tiny pits, seen as white specks, still remain. We polish until the very last white speck disappears from either the center or the edge of the mirror - whichever polishes out last. We then polish another couple of hours to be safe. It is imperative that the mirror be completely polished out. Not a single pit or the slightest haze should rear its ugly head when the mirror returns from the aluminizers.
A star test, Foucault test, or Ronchi test should not show astigmastism. If you see bending, rotate the mirror 60 degrees and try again. Chances are you will see the same bending, indicating that the mirror mount is generating the astigmatism, or if you are testing by propping the mirror on its edge, that the mirror is folding over like a piece of paper. If the deformity or bending follows the mirror as you rotate it, then the astigmatism is in the mirror's figure. Wait an hour or two and try again. If it looks like the mirror, then your best bet is to go clear back to the beginning by regrinding the back flat and regrinding the mirror face starting with 220 grit. You might get away with going back just to 500 grit, but if you do this, chances are that the astigmatism will only be reduced, not eliminated, and you will have to make a couple of passes back to 500 grit to entirely remove it. Check for astigmatism as soon as the mirror shows a shine to the edge, and check again at the end of polishing. If astigmatism rears its ugly head and you are certain that proper technique was observed, then check to be certain that your tool is not too thin. A flexing tool will not grind an even curve into the mirror.
Smooth the mirror's figure by diluting the polishing compound to 10 parts of water to 1 part of cerium oxide, by slowing down the strokes, and by exerting no pressure other than needed to push the upper piece back and forth. Do this for an hour or so and the Ronchi test will show a wonderfully smooth figure and surface.
The heart of large thin mirror making is in the figuring. Large mirrors call for tremendous amounts of parabolization. Bringing every zone into perfect parabolization is very challenging but doable. I like to parabolize large mirrors in controlled stages. The net result is a steady progression from sphere to parabola with minimal backtracking. During figuring, I continually adjust my strokes to ensure that the mirror's zones are parabolizing evenly.
In figuring mirrors, you must answer two questions: what is the true state of the mirror's figure, and what can be done to make it better?
The star test at high power is the final arbiter. The star test is extremely sensitive to spherical aberration, turned edge, and zones. However, the star test is often confusing when there are large or many errors, so we won't use it to figure the mirror. A glance or two at the star test as the mirror is being figured will prove instructive, though. I leave a rough wooden frame in the backyard, permanently aimed at Polaris. I drop the mirror in, attach the diagonal, and stick in an eyepiece.
I use the Ronchi test for the majority of my testing. Light passes through a precision ruled glass Ronchi grating, reflects from the mirror, and passes through the upper half of the grating into the eye. A series of curved bands are seen projected on the mirror face. The bands, when compared to their ideal shape as seen on a computer monitor or printout, reveal the mirror figure, in addition, overall smoothness is easy to see, and turned edge is easy to detect. It is key when applying the matching Ronchi test, that the bands be compared to their ideal shape at precise distances from the mirror's radius of curvature. I use a series of tests, 0.1" apart, starting from 0.3" inside of radius of curvature, to 0.6" outside of radius of curvature.
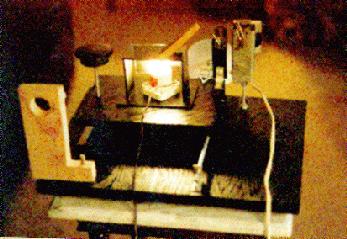
Here is a picture of the little Ronchi tester sitting on a Foucault stage that I have used for many years:
The mirror does not have to be wonderfully spherical before we start parabolizing, but it does need to be regular. If the mirror is irregular, with let's say a high center, low 50% zone, and high edge, then we continue our smoothing by lengthening our strokes slightly.
Parabolization strokes with sub-diameter tools are long straight strokes a bit off-center. Pushing the tool through the exact center of the mirror will quickly dig a central hole. If parabolization of edge zones lag, extend the strokes in a slight 'W' to the side, and move the tool further off center. Lagging parabolization of the outer zones is very common. If the edge zones lag too badly, you will find yourself in a tough figuring situation.
Trim the pitch on the tool into a very mild starfish pattern to ease zoning. Zoning occurs when the edge of the tool repeatedly hits the same zone on the mirror, leaving a trough. Hills can be fixed by planing them down, troughs are harder to fix because it is impossible to add glass! A narrow trough is fixed by varying the stroke over a larger area, or by using a larger tool, working until the rest of the glass is brought down to the level of the trough bottom. Wider troughs can be fixed by attacking the edges of the trough, turning it into a broad shallow zone, which can then be fixed by varying our parabolizing techniques.
Parabolization with full sized tools is done with MOT, and long wide strokes. In addition, it will be helpful if the pitch lap is trimmed to a mild starfish pattern. The long wide strokes concentrate the polishing action on the center of the mirror, and the star lap pattern aids in smoothly decreasing the parabolization action towards the mirror edge.
Amateurs have an often unappreciated advantage when figuring newtonian primaries, namely, that we can change our point of reference to select for easiest figuring. Consider parabolization from a sphere. We have three ways of going about this, each involving a different focal length. Using a small tool we concentrate parabolization towards the center of the mirror, decreasing the radius of curvature of the inner zones, thus shortening the focal length. We can do the opposite, that is, increase the radius of curvature of the outer zones, increasing the focal length, and making the center look short by comparison. This method is little used, but as an experiment, I once took a 20" pitch lap and arranged the pitch in an inverse star lap pattern where the pitch was concentrated most at the edge, and very little in the center. I then used MOT, short strokes with little side swing. Parabolization appeared quickly on the mirror. The third method is often adopted by small mirror makers, where the center is shortened and the edge is shorted, leaving the focal length unchanged. My method of MOT with full sized tool with mild star lap pitch pattern, is a combination of the first and third methods. Imagine how difficult figuring might be if the focal length had to be kept unchanged. It is vitally important to understand how polishing the center, polishing the edge, and polishing both center and edge, lead to parabolization when the focal length is allowed to float. Otherwise, you will sometimes pick the figuring stroke that is exactly opposite of what should be done, and only make things worse.
Turned down edge (TDE) is a shallow zone at the very edge of the mirror that focuses long, from 1/16" wide to 1/4" wide. Wider turned edges are called rolled zones. The Ronchi test reveals TDE as little hooks at the ends of the bands. You can determine the exact extent of TDE by masking off a portion of the mirror's edge until the hooks disappear. TDE is often not very deep, but because of the narrowness of the zone, looks precipitous. Many if not most mirrors have TDE, or had it until the edge was beveled or covered. Professional quotes for 'good to the extreme edge' are double the going rate. If the TDE is 1/16" or 1/8", it is often easier to increase the size of the bevel to cover the TDE. The loss of light is not measurable. TDE should not be ignored. A long focusing edge throws light outside the airy disk or diffraction spot, causing a loss of contrast and resolution.
I've had good luck combating TDE by using slightly oversized laps, for instance, a 21" lap for a 20" mirror. When pressing, keep the mirror in constant motion. When polishing, make sure that you can good contact between mirror and tool. Never press on the edge of the mirror.
If TDE is mild, ignoring it and continuing with standard parabolizing strokes can make it disappear. If TDE is strong, a small lap concentrated at the roll over point, or start of the Ronchi band hooks, is the standard fix.
Rolled edges are the result of insufficient parabolizing at the edge. The center and middle zones of the mirror are parabolizing, but the edge is lagging, causing the edge to look long by comparison. Move more parabolization out near the edge. With a sub-diameter tool stroking just off-center, extend more of the strokes in a 'W' fashion towards the edge, and lengthen the strokes. The tool should hang over the edge a couple of inches.
Often, a zone will just not respond. The center might stubbornly stay high, or the 70% zone may stay low. In these cases, using a sub-diameter tool, either concentrate action, or avoid action, in the offending zones. For large tools, simply cut away a little pitch on the tool's matching zone to reduce polishing action, or add a few drops of pitch to the tool at the matching radius to enhance polishing action. Use an X-Acto knife to scratch the pitch. After the mirror is placed back on the tool, you'll see through the back of the mirror that the scratched and gouged pitch has very much less contact than adjoining pitch.
The Ronchi test can tell you what zones need polishing. If the bands are not curved enough, then more polishing is required. If the bands are too curved, then too much polishing has occurred. This strategy can be applied to the whole mirror or to sections of the mirror.
Some examples:
Test often enough to prevent overshooting. A few minutes of extra cautionary testing can save hours of touchup polishing. Sometimes the bands don't look like they are changing very much, then they change drastically when the mirror begins to feel the accumulated figuring strokes that are being applied. If the mirror gets completely out of hand, don't be afraid to return to spherical and start again. An experienced amateur can figure a small mirror in minutes. It is quicker if the mirror figure is not correct to return to spherical and try again rather than to attempt tedious fixup figuring. Larger mirrors have more parabolization into them so every attempt should be made to keep the figure under control by increasing the parabolization gradually and evenly across the mirror.
Keep a notebook with notes and sketches of the Ronchi bands. You will likely find yourself in a situation that you have come across before. A log of your previous actions will make the path clear. If you get stuck, ask an experienced mirror maker for their take on the situation. A particularly valuable online resource is the atm list. You can join this discussion group by sending e-mail to majordomo@shore.net and in the body of the message put only the two words: subscribe atm.