The goals of fine grinding are to prepare the curved mirror face so that it is ready for polishing and figuring and make any adjustments of the focal length.
Previously in rough grinding we deepened the center of the mirror's face either by grinding with coarse grit and a tool, slumping in a kiln over a mold, or purchasing the glass pre-generated.
During fine grinding, we'll grind the mirror face against a tool with a series of ever finer grits. I like to use the fewest possible number of grit sizes, using professional quality grits that are accurately sized. This gives me the best confidence that the mirror surface is free of major defects and can be quickly polished in preparation for figuring.
The three grit sequence for fine grinding:
In microns, grit sizes are:
60-90 silicon carbide grit for rough grinding: 200 microns
220 silicon carbide grit for initial fine grinding: 60 microns (varies from 100 down to 20)
500 silicon carbide grit for smooth grinding: 20 microns (varies from 40 down to 10)
9 micron aluminum oxide for final grinding: 9 microns (varies from 15 down to 5)
Keep in mind that silicon carbide leaves pits about three times deeper than aluminum oxide.
Using more grit sizes wastes time. The difference in grit size between 400 and 500 grit is very little. Simply grinding a tad longer with 500 grit means avoiding 400 grit completely. Also, professional quality grits are better sized, meaning that the percentage of abnormally large and small particles is very small. Cheaper grits have a higher percentage of extra large and extra small particles. The anomalously large particles make the grit act like a coarser grit and the anomalously smaller particles slow down the grinding action. The cleanup time between grits is significant. Everything must be cleaned and cleaned again. Favor fewer cleanup changeovers between grits.
However, if you are a neophyte mirror maker, more grit sizes may make sense because it gives you a chance to remove missed pits. Pits from a grit size often don't become obvious to newbie mirror makers until two grit sizes later, e.g., 120 silicon carbide pits don't become obvious until 500 grit. A grit sequence of 120 SiC, 220 SiC, 320 SiC, 500 SiC, 25 micron AlO, 20 micron AlO, 15 micron AlO, 12 micron AlO, 9 micron AlO and 5 micron AlO (for smaller work that will survive the tiny mirror to tool separation, you can go down to 3 mciron AlO), gives the beginning mirror maker more time to catch and grind out pits from larger grit sizes.
Keep in mind that the way that silicon carbide attacks glass. The sharp pointed edges of the silicon carbide particles chip away the glass as they are caught, tumbling between mirror and tool. The glass sustains fracture damage up to a depth of three times the grit size.
By contrast, the aluminum oxide is a much gentler sliding of aluminum oxide particles in the shape of plates between the glass and tool. Using aluminum oxide as the final grit size greatly speeds polishing time since there are no deep fractures.
IF you haven't made a grinding tool during rough grinding, then make a fine grinding tool from plaster and tiles now. Strive to make the tool the same size as the mirror. Tools larger than 20 inches are difficult to lift gently onto the mirror face. Tools act roughly similar as long as they are at least 50% of the primary mirror diameter. Experiments during a recent mirror making class show that there is a distinctly superior recipe to creating the tool. The recipe goes like this.
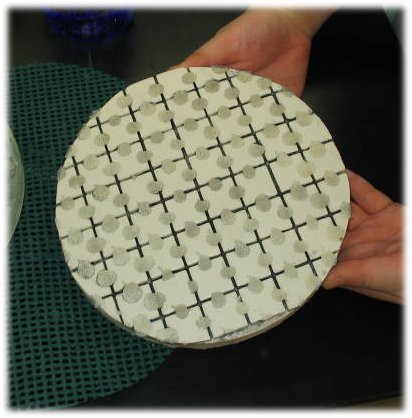
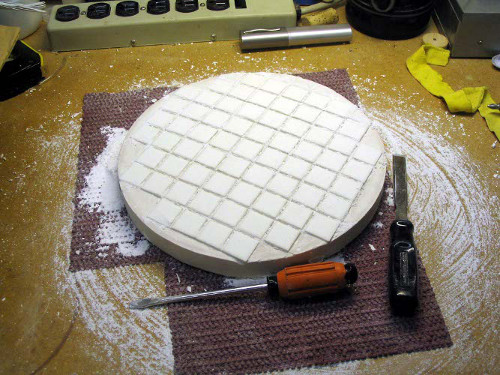
Two of Jerry Oltion's tiled tools. The first shows a tool immediately after it has cured enough to slide off the mirror face. The second shows a tool with freshly opened channels between the tiles.
Here's how I made tiled tools. First, I place the webbed tiles face up against a plastic sheet. Then I pour in the Hydrostone obtained from local hardware or ceramics store. Then I spend a few minutes grinding it into shape with 220 grit.The tool does not have to be pristinely perfect.

Beveling a mirror is critical to avoid small chips and flaking at the mirror's edge. A rounded bevel can help prevent scratches streaking in from the edge with very fine aluminum oxide in the final stages that are caused by particles clumping together. I like to maintain a 1/10 inch [2.5mm] bevel. A diamond belt or cloth will round the mirror edge in minutes; a wetstone will take longer. Stroke down and across to avoid lifting flakes off the mirror's face. Use water if necessary. Renew the bevel periodically if it becomes too small.
Beveling the tool's tiles is not necessary - sharply angled tile edges do not break off and cause scratches. Instead, sources of scratches include:
Scratches are hard to come by with 220 silicon carbide grit; they are very easy with the finer 9 micron aluminum oxide.
Fine grinding is done with tool on top (TOT). The grit lasts longer because it's not pushed down into the channels. Grinding also proceeds quicker because the tool spends more time working the mirror's edge, where most of the glass is located and where pits tend to grind out last.
Tool on top tends to lengthen the radius of curvature while mirror on top tends to shorten the radius of curvature. The sagitta should be checked every hour.
Initially the mirror may not be that spherical as it emerges from rough grinding, or has been slumped. If it's been generated, then it can be counted to be spherical; only the generating marks need be removed. Depending on the mirror shape after rough grinding, the sagitta may undergo unexpected leaps, either deeper or shallower as the mirror is brought to a spherical shape. Once the mirror becomes spherical, the sagitta can be adjusted by prolonged TOT or MOT with 220 grit. Remember that TOT will lengthen the focal length and MOT will shorten the focal length.
If the sagitta is far from desired, a return to rough grinding is indicated. If that's not practical, then 120 grit or even 80 grit can be used. The tiles will grind down if pursued too long, resulting in the need for a second layer of tiles to be glued on top of the thinned tiles. The new layer of tiles will need to be ground to shape with an hour to several hours of 220 grit, depending on glass size and type.
Run each grit size for about two hours; longer for large mirrors larger than 12 inches diameter.
A fine grinding session is called a 'wet' and runs five to ten minutes long. Start with a thoroughly washed mirror and tool, placing the mirror on the bottom. Make sure the mirror's face is clean and dried. Sprinkle some grit on the surface. You will quickly see how much grit is necessary: too much results in lots of grit being pushed off the mirror's edge, too little results in the wet ending prematurely. Using a water bottle add an equal volume of water. Again, you will quickly gauge how much water to add: too little results in a sluggish muddy mess, too much results in the wet ending prematurely and possible scratching. Using your fingers, mix up the grit and water mixture, spreading it thinly across the mirror face. Gently lower the tool on top, and holding the tool upward such that there is as little pressure as possible, gingerly move the tool in a few slow strokes, listening carefully for any scratching sounds. If they are heard, remove the tool, wash the tool and mirror and start over. After a half dozen short stokes, relax the upward pressure and commence with the intended strokes. As the mixture thins and dries out, spritz a few drops of water and continue. Eventually, the sound level will drop off indicating that the grit particles are exhausted, broken down in a muddy mixture. Lift the tool off. Wash, dry and begin a new wet.
Stroke the tool across the mirror face, going past the mirror edge about 1/6 the tool's diameter. Vary a little bit from side to side (no more than 1/10 the tool's diameter). Take ten or so strokes, then take a step to the right, spin the tool a partial turn clockwise, and continue stroking. It's important to keep the tool moving at all times - don't let it pause on top of the mirror, especially with finer grits because it can seize. Placing the water bottle on top of the tool is a good way to ensure smooth tool action. Don't rotate the tool during the strokes. Don't press down on the tool any more than is necessary to grip it. Keep your hands spread out across the middle of the tool; avoiding pressing down on the tool's edge. From time to time, swirl the tool to evenly distribute the grit and water mixture. After a few minutes, add a couple of drops of water to prevent drying. The tool and mirror can suddenly seize together if the grit becomes too dry and thin. Adding a dash of water also clears the 'mud' or broken down grit. Don't go for too long and let the mixture become too thin. This also carries a high risk of sudden seizing. Swirl the tool by spinning it (not too fast!) clockwise while making figure eights across the mirror's face. After every wet, rotate the mirror clockwise about 30 degrees.
This is called, 'walking the barrel'. If you can't walk entirely around the mirror, then work from a counter corner, walking 90 degrees before rotating tool.
Vary a little bit the stroke length and step size and spin of the tool along with spin of the mirror. This variation is not random: in fact it is very regular. Random would be using the throw of a die to determine stroke length, step size and so forth. It is this regularity that drives the tool and mirror to spherical shapes. A truly random approach results in a 'random walk' towards an astigmatic, non-spherical figure. It is this regularity that is the key to avoiding astigmatism, particularly in large thin mirrors.
Supporting the mirror in order to avoid astigmatism is a particular concern. Options include:
For large thin mirrors, say 12 inches [30cm] or greater and 1.5 inches [4cm] or thinner, the mirror back must be ground flat, or at least regular in shape before beginning fine grinding the mirror's face. Cast a tool specifically for the mirror's back, and grind with 220 grit, inspecting for low unground spots. Grind until they disappear. It's OK for the back to be ever so slightly spherical. Grinding to 220 grit is necessary to avoid the Twyman Effect; some experienced workers grind their back to 25 micron aluminum oxide and some even polish the back.
Here the backside of a very fast 25 inch [635cm] mirror is being ground.
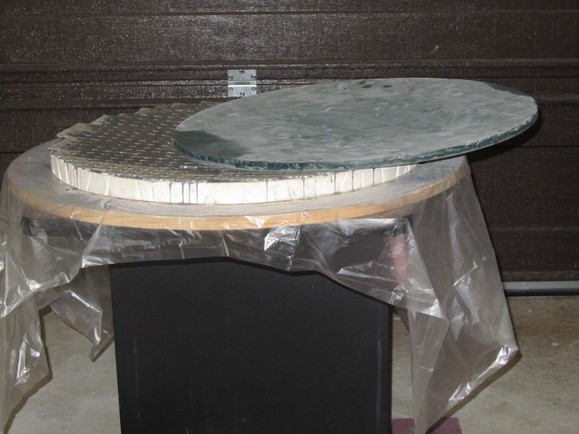
The concave tool that is grinding the backside is recharged with more grit and the mirror placed on top ready to begin the next wet.
For large thin blanks, check the wedge. Wedge is the difference in thickness from one side of the blank to the other. Take a series of measurements around the mirror's edge, using a permanent marker pen to write the results on the mirror back. Preferentially grind the mirror back where the wedge is too thick. Then re-grind the mirror back flat. Measure again and repeat until the wedge has disappeared. Wedge can cause astigmatism; the thinner side of the blank flexes more and adopts a different radius of curvature. I keep wedge under 0.002 inch.
Plan to spend two to three hours per grit size. This is a relatively constant time regardless of size of mirror, as long as the tool is as large as the mirror. Using a magnifying lens, mark the largest pit you can find by circling it from the back side of the mirror using a permanent marker. Grind until it's gone. Once again, mark the largest pit. Eventually you'll notice that no large pits are to be found, just slightly larger and smaller pits. Circle the largest to remove for the next grit size. Plate glass grinds a third quicker than Pyrex but can show more damage than Pyrex if the fine grinding tool is pressed too hard while grinding.
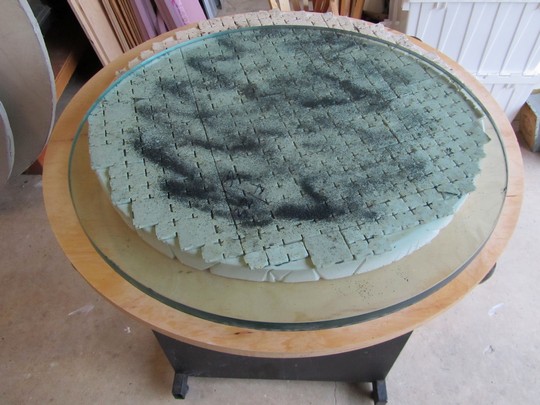
Here is the 25 inch F2.6 being fine ground face-up with 220 silicon carbide grit. Notice that the mirror is supported by the tiled tool used to grind the backside regular with a kitchen non-slip rubber mat placed between.
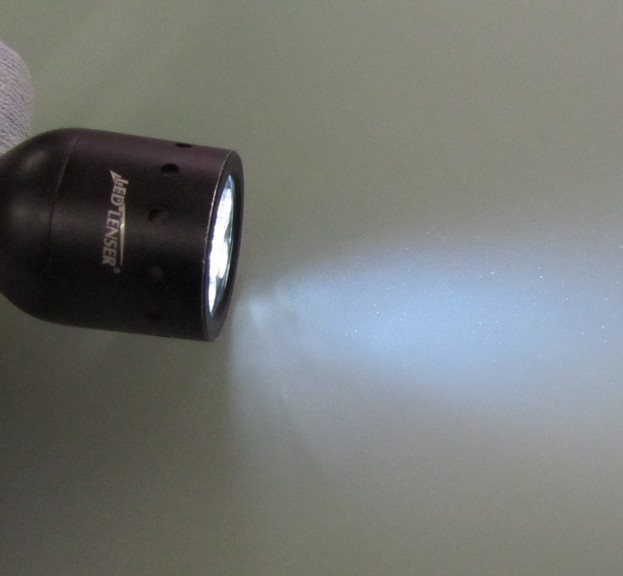
Here are 500 grit pits sparkling in the light remaining after two hours of 9 micron aluminum oxide.
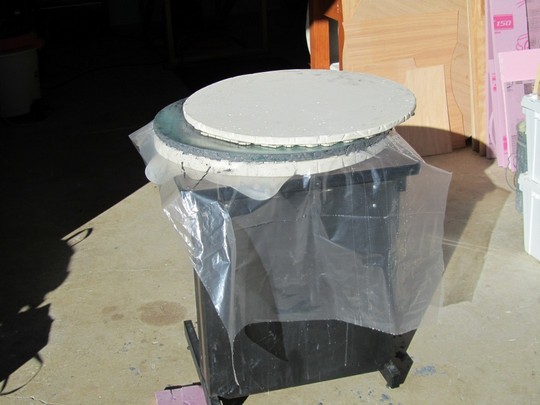
Here is the 25 inch fine ground to 20 micron aluminum oxide. Notice the even shine from front to back.
I was unable to complete 9 micron aluminum oxide fine grinding because of scratches. Backing off to 12 micron resulted in fewer but some scratches. Larger very thin work with heavier full sized tools may not be able to be brought to a 12, 9, 5 or 3 micron finish. More time will be spent in polishing removing the pits.
When you finish the 9 micron aluminum oxide, the mirror will be ready for polishing and subsequent parabolizing.
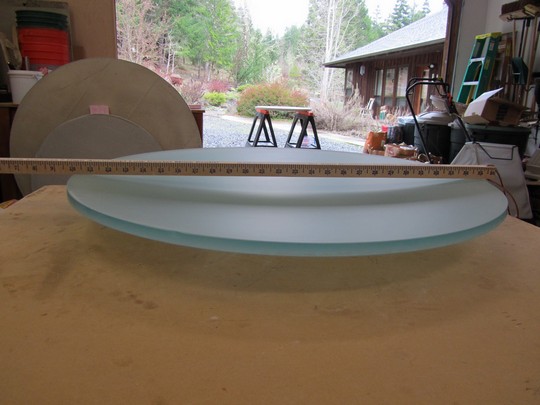
6 inch [15cm] fine ground and a 10.5 inch [27cm] fine ground, reading for polishing and parabolizing.
(end of fine grinding)
For more see