
.JPG)
 II.JPG)
The first milestone is putting a curve into the mirror face. The curve's depth dictates the mirror's focal length. The curve should be spherical.
Creating the curve can be done by several methods:
The first method is by far the most popular. Grinding the curve into the mirror face can be done by one of the following approaches:
Grinding Stands
I use an old printer stand. Here is a 25 inch [635cm] mirror being rough ground (note that the mirror back is supported by the backside grinding tool with a flexible no-slip mat between) followed by a beautiful grinding stand from the Delmarva Mirror Making Seminar (note the weight below).
If you are constrained to standing in one spot, then rotate the bottom piece every few strokes just as you would step around the barrel.
Grinding Tools
To construct a grinding tool, attach or embed unglazed ceramic tiles, 1 inch [2.5cm] square, to one of these substrates:
I've successfully used plywood tools up to 8 inches [20cm] diameter. I glue plywood layers together for a total thickness of 1 inch [2.5cm], then embed the tiles in polyester resin that also coats the rim and backside. Plywood tools are very lightweight. By contrast, stone and concrete tools are very heavy. A granite stone tool can be used without tiles, if channels are cut into the face. Concrete tools take weeks to cure and are hard to handle gently because of their weight, cracking when dropped.
Ring Tools
A metal ring of half the mirror diameter is ground against the glass, stroking across the center and overhanging a bit at each end. Half sized ring tools are the best compromise between grinding in a curve quickly and overall grinding action. Take a half dozen strokes, then move a step in one direction. Repeat, repeat, repeat. This rapidly tears into the glass, creating a curve quickly. I generated a 16 inch [41cm] f/6 plate glass mirror in about 4 hours with 80 silicon carbide grit. When the sound dies down, recharge with another sprinkle of grit and a spritzing of water. Many use too much grit and not enough water. As the mud or discarded grit and glass builds up, wash it or wipe it away. It is best to clean the mirror by dunking it in a bucket. Don't pour the mud down the drain as it can cake up the plumbing.
Extreme pressure can be applied to the ring tool. Because the ring tool is metal, it changes shape very little while grinding on the glass. A tiled plaster tool grinds both tiles and plaster, with both starting flat, meaning that the tile must be ground convex and the glass ground concave. Ring tools reach desired depth about twice as fast as tiled ceramic tools. Ring tools for smaller mirrors should be no more than half the mirror diameter size; otherwise grinding time is increased. Don't forget to apply pressure with smaller ring tools; they can be hard to grip.
Stop just before desired depth: about 5/6 of the way towards the goal is good. The center will deepen during the first stage of fine grinding as contact is achieved across the mirror face and fine grinding tool. On larger mirrors, the ring tool may leave the zones part way to the edge a little underground. For these mirrors, as you near the depth, you can alter the strokes to be off-center. This will prevent the mirror zones partway to the edge not being ground deep enough.
I use a discarded pulley. Ring tools can be pipe floor flanges - anything round metal object that will touch in a ring on its perimeter.
16 inch [41cm], 10 inch [25cm], 6 inch [15cm], 16 inch [41cm] mirrors being rough ground with ring tools. Images by Jerry Oltion
Geometrically, two surfaces when rubbed against each other, must create a concave sphere on one surface, and a convex sphere on the other surface. Flat surfaces are special conditions where the curve is infinite. Any high spots are ground off, and any low spots are not ground. A ring also generates a concave sphere because a circle touching a two dimensional curve acts in both dimensions, wearing down the high spots and avoiding the low spots.
Tiled Plaster Tools
Tiles allow grit and water to flow across the mirror blank. This channeling effect helps prevent sticking and scratching.
Plaster thicknesses of 1 to 1.5 inches [2.5 to 3.8cm] are a good compromise between rigidity and heaviness. The plaster is poured onto the mirror face that has a paper dam taped around the edge. Smearing the glass with a release agent like butter or grease or oil helps, but is not necessary in smaller sizes. After the plaster sets in a few minutes, twist off the tool from the glass. Let the plaster finish drying overnight.
Leaving the tiles attached to their ribbing, I place dobs of JBWeld on the tile faces, placing the tile matt over the plaster face. The ribbing will quickly grind off. If necessary for larger deeper work where the tiles might grind through before finishing, the tiles can be glued tightly together and placed on their edge on the plaster tool.
Grind with the tool on top in a to and fro pattern, overhanging each end by about 1/6 the mirror diameter. After a half dozen strokes, take a step to one side and repeat. Then spin the tool on top in the opposite direction. Repeat ad naseum. When the sound dies down, recharge with another sprinkle of grit and a spritzing of water. Many use too much grit and not enough water. As the mud or discarded grit and glass builds up, wash it or wipe it away. It is best to clean the mirror by dunking it in a bucket. Don't pour the mud down the drain as it can cake up.
20 inch [51cm] tile and plaster tool, used to rough grind a 30 inch [76cm] Pyrex mirror
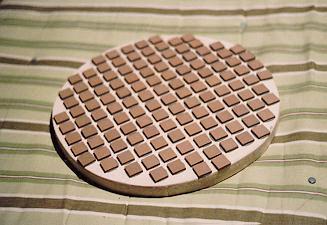
8 inch [20cm] tiled tool. The tile's backing is yet to be ground off. Image by Jerry Oltion
For very large tools, I add vermiculite to the mix to reduce weight by up to 2x. Here are images of a 30' tool immediately after pouring and after separating from the glass. Here the tiles are embedded. Stick them to the release thin plastic layer on top of the glass with spray adhesive.
Thin mirrors may need the backside ground regular.
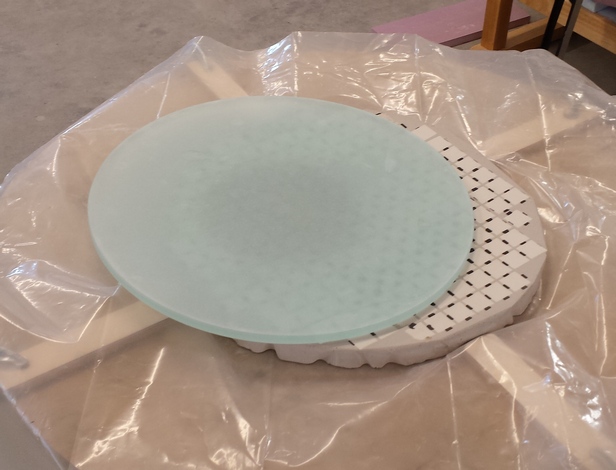
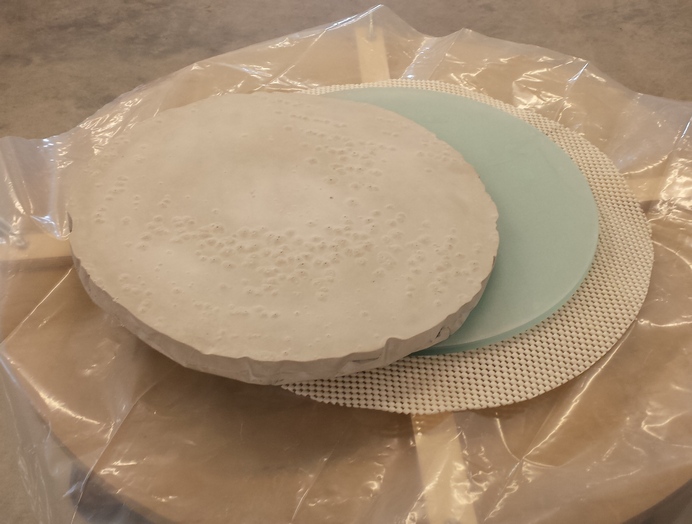
Grinding the backside through 220 grit may be necessary to reduce the Tyman Effect which can cause astigmatism that cannot be ground out. This was the case for the ultra-thin 16.25x3/8 inch [410x10mm] slumped meniscus mirror. Grinding the backside can eliminate low irregular areas on the backside that may print-through to the front side. The backside tool is made just like the frontside tool, except that the resulting shape will be concave, not convex. This backside grinding tool can also serve as a support for the mirror too (be sure to insert a thin no-slip mat between tool and glass).
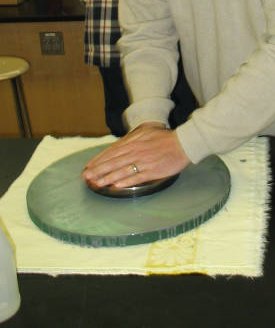
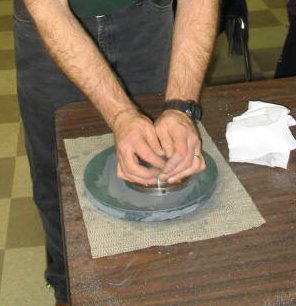
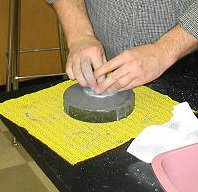
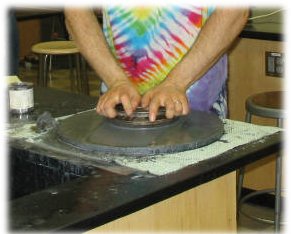
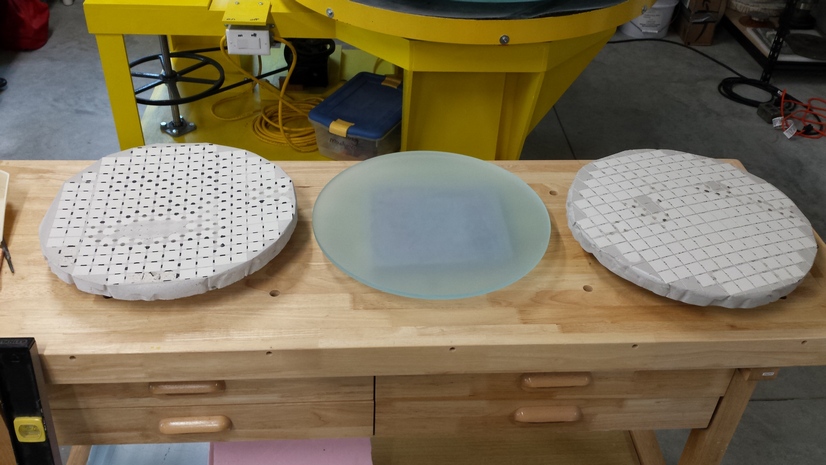
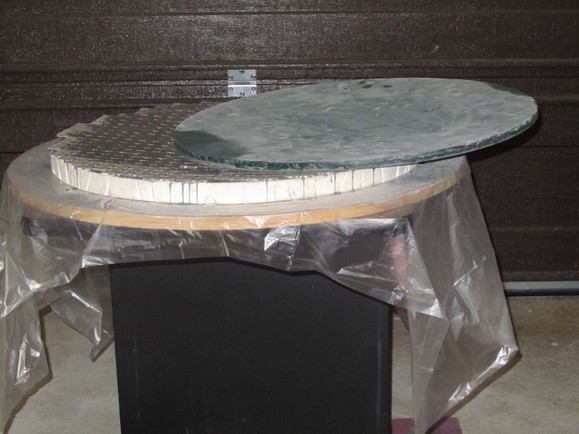
Here are images of the 16.25 inch [41cm] mirror 1) sitting on the backside tool, topside tool on top of mirror that's on top of the no-slip mat that rests on top of the backside tool, and the mirror with the two tools.
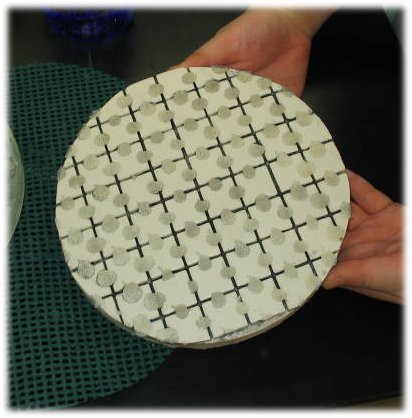
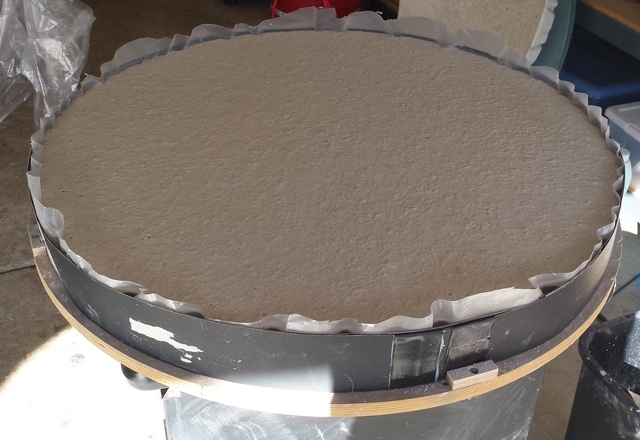
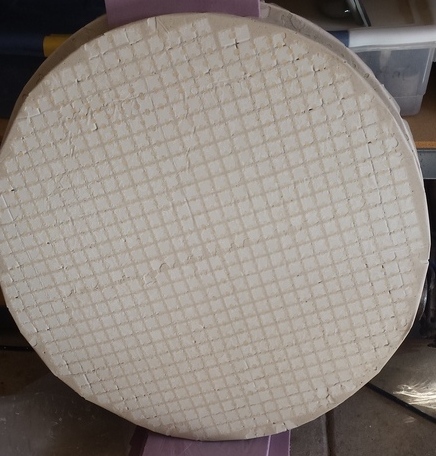
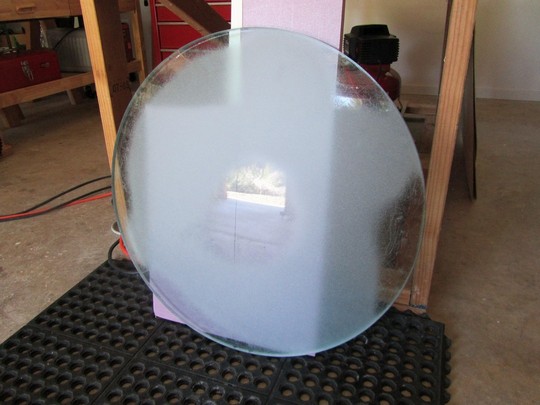
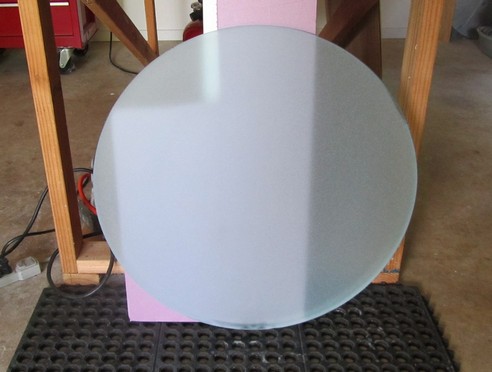
Here you can see the grinding of the 25x1/2 inch [635x10mm] mirror's back in operation, along with an initial flash grind of the back showing that while the glass was slumped fairly evenly, there are significant low areas. The final image shows the back ground to a regular curve. It doesn't have to be strictly spherical - just regular without large low spots.
My process is:
How Grinding Works
Silicon carbide particles are sharp edged. When pressed and rolled between tool and glass, the particles dig into and fracture the glass. The greater the pressure, the more glass is removed.
The Wet
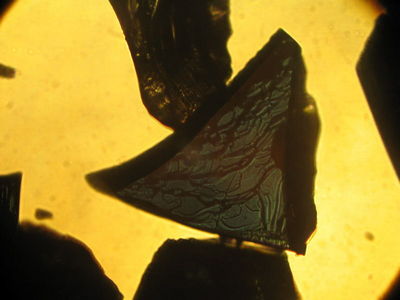
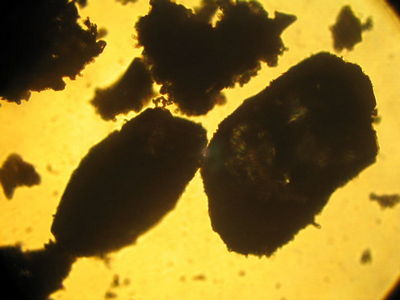
Grit and water are added between tool and mirror. The top piece is stroked back and forth with pressure. Let the noise guide you - louder is best. In fact on large work it can be so noisy that one must shout to be heard. Too slow or too little water and effort will be expended in the stroking. Too fast or too much water and the grit will tend to roll. After a few minutes the fractured glass builds up with the broken down silicon carbide resulting in mud. The noise will have subsided. The wet is over. Here is what 80 grit with its sharp edges looks like before the start of the wet and after it has been worn down to ineffectiveness (images courtesy Jerry Oltion).
The Bevel
Beveling a mirror is critical to avoid small chips and flaking at the mirror's edge. I like to maintain a 1/10 inch [2.5mm] bevel. A diamond belt or cloth will round the mirror edge in minutes; a wetstone will take longer. Stroke down and across to avoid lifting flakes off the mirror's face. Use water if necessary. Renew the bevel periodically if it becomes too small.
When the curve reaches the desired depth, the mirror will be ready for fine grinding, which will repair the damage done to the mirror's face.
How Deep? The Mirror's Sagitta
The depth in the center of the mirror is the mirror's sagitta. The sagitta determines the mirror's focal length and focal ratio. There is plenty of time to contemplate the desired focal length while rough grinding! Here's a table of depths across a variety of mirror diameters and mirror focal ratios:

The precise formula for calculating (spherical) sagitta is:
sagitta = RadiusCurvature - square root (RadiusCurvature squared - MirrorRadius squared). See http://liutaiomottola.com/formulae/sag.htm
There's a simpler formula floating around that easy to calculate using pencil and paper. It gives somewhat incorrect numbers for fast low focal ratio large mirrors. There is no reason in today's computer aged not to use the precise formula. Here are two calculators using the precise formula that will calculate the sagitta or the focal ratio:
Sagitta Calculator
Focal Ratio Calculator
The Oltion Relationship
Jerry Oltion points out that if the sagitta is 1/16 of the unit of measure, the focal ratio is the mirror diameter. For instance:
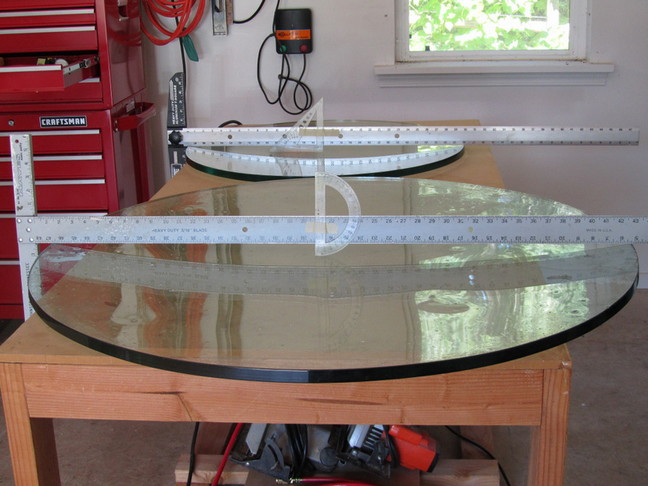
Measuring the Sagitta
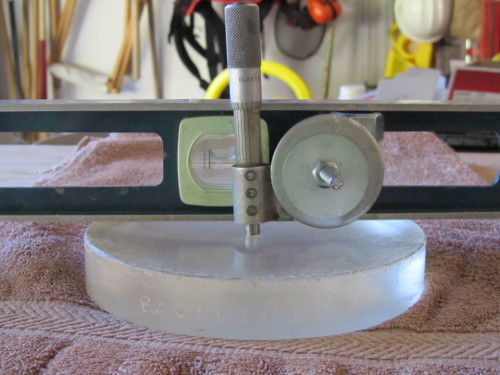
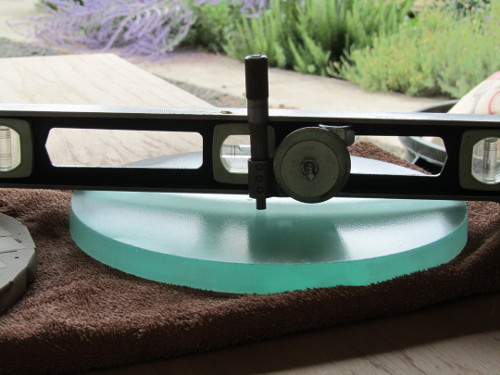
I use a level with a micrometer whose caliper I cut off. Drill bits can also be inserted under a straight edge that stretches from mirror side to mirror side. Make sure you measure at the center of the mirror. In many cases, less precision is called for. Inserting American coins work well. Here is a table of coins and their thicknesses in inches:
| Coin | Thickness (inches) |
|---|---|
| penny | 0.061024 |
| nickel | 0.076772 |
| dime | 0.05315 |
| quarter | 0.068898 |
| half-dollar | 0.084646 |
| dollar | 0.07874 |
Fast mirrors can be rather deep. Here are 6 inch [15cm] F/2.8 and 10.5 inch [27cm] F/2.7
Steady Progress
Progress is proportional to time and pressure, given reasonable stroking speed. The center of the mirror often deepens first. Then as the strokes are made less extreme, the mirror becomes more spherical. This gives the appearance of slowing down; in fact, the central depth can actually lesson. It's curtail the extreme strokes when 90% of desired depth is reached. Then as the mirror is made spherical, the mirror gradually deepens.
Radius of Curvature and Focal Length, Spherical and Paraboloidal
The radius of curvature is the distance from the mirror to a light source where the focus is directed back onto the light source. This is the distance that tests such as Foucault, Caustic and Ronchi are positioned from the mirror. The mirror must be spherical in shape for it to return all the light directed to its surface back exactly where it originated.
The focal length is the distance from the mirror to the focus when light is received from distant astronomical objects. This is the distance that eyepieces and imagers are placed from the mirror when focused on the planets, stars, and galaxies. The mirror must be paraboloidal in shape for it to reflect all the light hitting its surface from a distant star to a single focus point.
Why the radius of curvature is twice the focal length
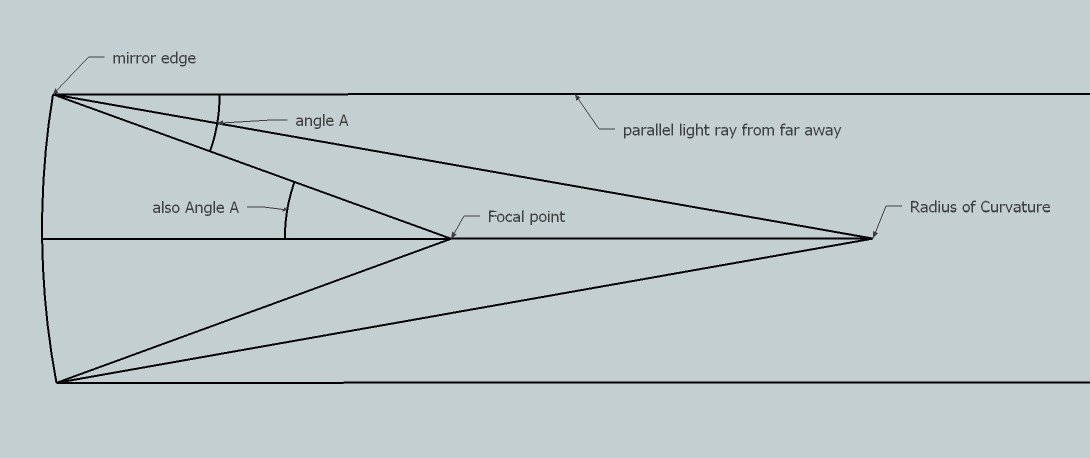
Light emanating from the Radius of Curvature strikes the mirror's edge and is reflected back onto itself. Parallel light coming from far away strikes the mirror's edge and is reflected back at twice the incident angle to the Focal point. This is angle 'A'. If we draw the same angle from the mirror's edge using the mirror's curve and its center, we arrive at the Focal point, half that of the Radius of Curvature. The line bisecting angle 'A' crosses the center line at twice the distance of the Focal point. As the mirror's edge becomes more curved, the Focal point moves inward towards the mirror, becoming less than half that of the Radius of Curvature. The fix is to change the mirror's curve from spherical to parabolic.
The parabola is defined as the curve that results from the series of points where each point is equidistant from the focus and from a line or plane called the directrix. Look what happens with the point that is exactly between the focus and the directrix. The distance to the directrix is exactly twice that of the distance to the parabola. The curve that reflects the light emanating from the parabola's focus back from the directrix is the sphere that is centered on the parabola's focus. The sphere's radius is twice that of the parabola's focus. This is one way to understand why the radius of curvature of the sphere is twice the focal length of the parabola. See http://www.mathwarehouse.com/quadratic/parabola/interactive-parabola.php for an interactive graphing of the parabola. Notice that no matter where you move the parabola or otherwise define it, the focal length of the parabola is half that to the directrix, or the radius of curvature.
Another way to understand that the radius of curvature is twice the focal length is to consider the rate of change of the change in slope of the sphere compared to the parabola. Note that the rate of change of the change in slope of the parabola is the second derivative, y' = 2 / focal length. The rate of change of the change in slope for a sphere is 1 / focal length. The difference is our 2x factor. Stated another way, the parabolic curve at the closest point to focus changes at twice the sphere's changes, so is half the distance.
Finally, consider the inverse transform of the parabola: the cardioid. Executing the cardioid results in a curve that is twice the distance of the rolling circle: another instance of the special 2:1 relationship between sphere and parabola. See http://en.wikipedia.org/wiki/Cardioid.
Why we need both sphere and parabola
When rubbing tool against glass, a spheroid is produced: concave for the mirror and convex for the tool. But the shape that will focus light coming from distant astronomical objects to a single point is a paraboloid. Because the mirror's focal length is large in relation to the mirror's diameter, in other words, the focal ratio is large, the difference between sphere and parabola is very little: a few millionths of an inch in the mirror's surface for a typical amateur telescope. We grind and polish to a sphere, then figure to a parabola. We test at the sphere's focus (the distance being the radius of curvature), calculating and looking for the slight deformity caused by the parabola. It is this slight difference between parabola and sphere that we can calculate exactly and test for to a fraction of the wavelength of light that allows us to figure paraboloidal mirrors that perfectly focus light from distant astronomical objects.
(end of rough grinding)
For more see