Though our species isn't the only toolmaker on the planet, we have taken toolmaking to new heights. Stone tools go back 3.3 million years. Pounding, scraping, knapping, grinding combined with fire, heat and melting has lead us to grinding telescope mirrors from glass.
Making a telescope mirror is one of the most satisfying and sublime joys you will experience. It's also arguably the most accurate surface made by man or machine. If the mirror is expanded to the size of a football field, then the mirror's surface will be smooth to 1/1000 inch or 1/30 millimeter! Our experience begins with the varied sensations of touch and sound during grinding and carries through to the cerebral challenge of parabolizing the mirror to perfectly focus the light. Our experience continues by placing the mirror in a telescope to contemplate the mysteries of the universe and the meaning of life.
My 13 inch [33cm] f/3.0 thin meniscus plate glass mirror ready for its aluminum coating. And here I am enjoying views at the eyepiece at an Oregon Star Party.
Comparing mirror making to rock climbing from a PBS interview.
MOYERS: What drew you to climbing?
HOUSTON: It's a beautiful thing to do. You're surrounded by beauty. No matter whether it's a storm, or a sunny day, or clouds, or not, the mountains are simply beautiful. I just liked climbing. I like the feel of the rocks.
MOYERS: The feel of the rocks?
HOUSTON: Rock feels good, yes.
MOYERS: How? I mean, you're talking to somebody who doesn't climb.
HOUSTON: Well, rock climbing; you have a sense of the rock. Almost as though it were a living thing under your hands and you learn to explore. I've never been a great climber. I'm just a competent climber and I know my limits. But I love getting out and doing it.
Our mirror should focus the light as sharply as possible. We want the stars to be pinpoints in the eyepiece at our telescope's highest powers, tight dots in our digital images and we want our planetary and lunar views to be richly detailed.
You'll test your telescope mirror to find circular areas called zones, that need to be further polished. You'll test your mirror for smoothness, all using simple testersa made from inexpensive easy to obtain materials.
I'm purposefully side stepping discussions of the Rayleigh Criteria et al. Don't be sucked into the online whirlpools swirling around wave ratings, secondary sizes, contrast, super polishing compounds, exotic testers and so on - the list is endless.
Suffice to say that if you concentrate on producing a smooth mirror that focuses sharply then properly baffle your telescope for best contrast then you'll have a telescope that you can enjoy every night. For example, the 13 inch f3.0 mirror from above, in the Ronchi Calc's software nulled and thinned display:

To finish a project successfully, it is useful to imagine the finished product and determine what needs to be done. This begats an earlier stage that we can similarly treat. Eventually we reach the beginning of the project, with a clear series of steps. The four milestones in reverse for completing a mirror are: parabolizing, polishing, fine grinding, and curve generation. Each stage depends on the previous stage being completed correctly.
Here are the four steps in sequence
No matter how complicated and how many ins and outs you consider, never forget that mirror making boils down to these four essential steps. It need not be that hard!
Here is an introduction to the steps.
Rough Grinding
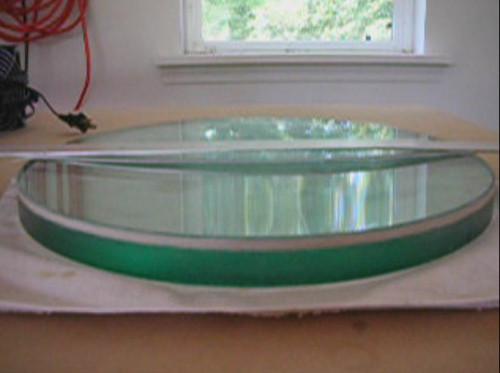
Unless the mirror comes pre-generated, the initial curve will have to be ground into the mirror. Typically a tool is made then the mirror is ground on top of the tool with long wide strokes, gradually creating the curve in the mirror. Alternatively a ring tool of half the diameter of the mirror used on top of the mirror's flat face with the coarsest grit will rapidly grind a spherical curve into the mirror.
Grinding a 6 inch [15cm] mirror to F/2.8 using a ring tool.
.JPG)
 II.JPG)
Rough grinding the backside
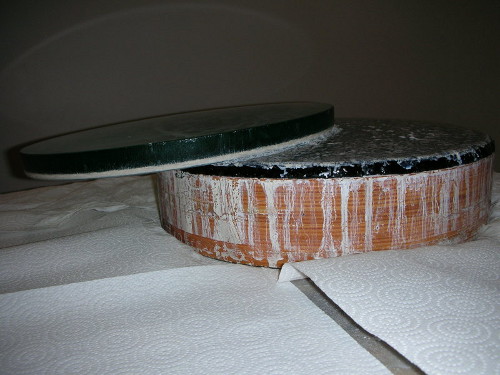
Mirrors require a flat (or if meniscus, a curved backside). If the mirror's back is not flat, then the backside should be ground through 220 silicon carbide to preclude the Twyman Effect. For example an ultra-thin 16.25x3/8 inch [410x10mm] exhibited astigmatism caused by the Twyman Effect. When the back side was ground with 220 grit, the astigmatism disappeared.
The tool
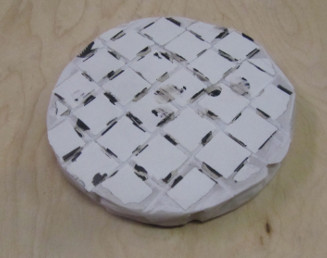
I use plaster tools cast to the curved mirror with unglazed ceramic tiles glued to the face. Stroking the tool on top (called TOT) of the mirror, I rotate the mirror underneath 30-45 degrees every fifteen minutes. This prevents astigmatism from occurring via print through from the mirror's backside. Mirror on top (called MOT) can also be used to avoid astigmatism, since the tool supports the mirror, but the grit seems to fall down between the tiles requiring more grit and wets to complete.
6 inch [15cm] tiled tool
Fine grinding
A series of ever smaller grits are employed in order to repair the damage caused by rough grinding, concluding with aluminum oxide which leaves much smaller pits and fewer fractures compared to the silicon carbide. This stage is called fine grinding.
I like to use three grit sizes, 220 silicon carbide, 500 silicon carbide, and 9 micron aluminum oxide. Another good sequence is 220 silicon carbide followed by 25 micron aluminum oxide concluding with 9 micron oxide. Grit of a particular size comes with a wide distribution of particle sizes. Typical are 20% of particles that are twice the stated size. Comparing particle sizes of 400 grit with 500 grit, the size ratio looks to be 4:5. But when looking at the 20% particle distribution, it is a nearly identical 9:10 ratio. Consequently it duplicates effort to run through a long series of grit sizes, as commonly practiced: 220, 300, 400, 500, 600, 25 micron, 15 micron, 12 micron, 9 micron, and 5 micron aluminum oxides.
The third and final grit that I use is 9 micron aluminum oxide. Ending with 9 micron instead of 5 or 3 micron reduces the chance of sticking on large blanks and controls scratching. Comparing 9 micron to 5 micron looks to be a nearly two times reduction in glass pit depth, but looking at the 20% particle distribution, the reduction is only one-third.
Polishing
To achieve this preparatory to parabolizing stage, the mirror is polished to a shape that is smooth and spherical. The rate of glass removal during polishing is exceedingly small. It could take us fifty years of non-stop polishing if we were to start with a flat piece of glass, hence the preparatory stages of rough then fine grinding.
Polishing with a pliable material like pitch (first used by Isaac Newton three hundred years ago) results in a smooth polished surface, accurate to a fraction of a wavelength of light, that is ready to begin parabolizing. The act of polishing is both a mechanical and a chemical process.
Pictured is an oversized 14 inch [36cm] pitch lap for 13 inch mirror; note the micro-facetting in place of channels. Next I am parabolizing the 13 inch [33cm] f/3.0 mirror with extremely long Mirror On Top strokes.

Parabolizing
In order to make an indistinguishable from perfect star image, the mirror surface must be accurate to a small fraction of the wavelength of visible light. The stage of adjusting the mirror surface to a paraboloidal shape by preferential polishing is called parabolizing. To begin this phase, the mirror surface should be smooth and spherical.
More success comes from seeing mirror making as a process. For example, testing a mirror isn't just testing that mirror, instead testing should be about informing the process. Is my parabolization process working? How should I adjust it? Too often the mirror maker is tempted into one-off wild forays, far from the process, that rarely works.
My first time I understand this was a kid reading Texereau, where he wrote these passages translated as:
- Jeff Baldwin's telescope making pages http://www.jeffbaldwin.org/atm.htm
- Bell's The Telescope
- Richard Berry's Build Your Own Telescope
- Richard Berry and David Kriege's The Dobsonian Telescope
- Serge Bertorello's The creation of a plane mirror
- John Brashear's The Production of Optical Surfaces from Summarized Proceedings and a Directory of Members, 1871, http://tinyurl.com/pn3crhl
- Sam Brown's All About Telescopes
- William J. Cook's The Best of Amateur Telescope Making Journal
- John Dobson's How and Why to Make a User-Friendly Sidewalk Telescope
- Myron Emerson's Amateur Telescope Mirror Making
- GAP 47's machines summary
- Paul Hasluck's Glass Working By Heat And By Abrasion
- David Harbour's Understanding Foucault
- Albert Highne's Portable Newtonian Telescopes
- Neale E. Howard's Standard Handbook for Telescope Making
- Albert G. Ingall's Amateur Telescope Making, Volumes 1-3
- Henry King's The History of the Telescope
- Italian telescope making
- Karine and Jean-Marc Lecleire's A Manual for Amateur Telescope Makers
- Mike Lockwood's mirror making and publications
- Allyn J. Thompson's Making Your Own Telescope
- Allan Mackintosh's Advanced Telescope Making Techniques - Optics, Advanced Telescope Making Techniques - Mechanical
- Daniel Malacara's Optical Shop Testing
- George McHardie's Preparation of Mirrors for Astronomical Telescopes
- Robert Miller and Kenneth Wilson's Making and Enjoying Telescopes
- James Muirden's Beginner's Guide to Astronomical Telescope Making
- Jason Nelson and Shawn Iles' Fabrication of ultralow-roughness surfaces: The Beilby layer
- Donald Osterbrock's Ritchey, Hale, and Big American Telescopes
- Henry Paul's Telescopes for Skygazing
- Damian Peach's analysis of aperture, optical quality, central obstruction and seeing
- Robert Piekiel's Testing and Evaluating the Optics of Schmidt-Cassegrain Telescopes, Making Schmidt-Cassegrain Telescope Optics, ATM's Guide to Setting up a Home Optics Shop, Tips for Making Optical Flats
- Norman Rember's Making a Refractor Telescope
- Sherman Shultz's The Macalaster Four-Goal System of Mirror Making and the Ronchi Test, Telescope Making #9
- John Strong's Procedures in Experimental Physics
- Scientific American's The Amateur Astronomer
- H.R.Suiter's Star Testing Astronomical Telescopes
- Telescope Making magazine (no longer published)
- Jean Texereau's How to Make a Telescope
- Stephen J. Tonkin's Amateur Telescope Making
- John Walley's Your Telescope, a Construction Manual
- Wilkins and Moore's How to Make and Use a Telescope
- Stellafane Amateur Telescope Making pages http://stellafane.org/stellafane-main/tm/atm/ (comprehensive collection of links to web articles)
- Advanced mirror makers who are also experienced observers
(end of introduction)
For more see