Star Testing a Telescope
by Mel Bartels
Want to know when your telescope is cooled down, when the atmosphere is steady, when the telescope is optically aligned? Then the star test is for you.
Want an end-to-end test that examines all elements? Then the star test is for you.
You need no additional equipment: just a high power eyepiece, experience and humbleness.
You conduct the star test by studying the changing distribution of light as the star is brought in and out of focus.
With the star test you can tune the telescope for top performance and judge the quality of the optics.
What's better: car tires or truck tires? The answer depends if you are driving a car or a truck! The fitness of any optical test is determined by its usefulness to the process. Different optical tests are needed at different times in the mirror making process: grinding, polishing, parabolizing and final evaluation.
The star test under the stars is best used for finishing parabolization and for final evaluation. It depends on clear skies with decent seeing. The indoor star test can be used for figuring but does require a quality telescope of equal or greater aperture.
The star test reveals grave injury as well as meaningless slights. Every mirror fails the star test ***. It is up to you to interpret the test results. *** In fifty years I have seen only one mirror sensibly pass the star test, a 30 inch [76cm] F4.5 made by James Mulherin of OMI.
Do keep in mind that the star test's one weakness is difficulty discerning small scale mirror surface roughness. For this the Lyot phase contrast test is exceedingly discerning, but even the lowly Foucault and Ronchi tests do a fine job of revealing roughness.
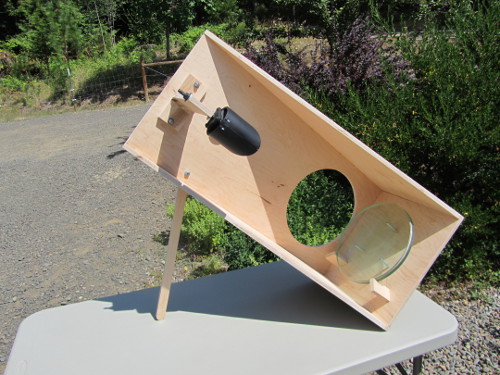
Normally one tests a telescope under the stars with a high power eyepiece on a night of decent seeing. The star test can also be used to parabolize or figure a mirror. In this case the telescope tube and mounting does not have to be finished. Instead a temporary testing rig can be quickly assembled.
Here are images of my outdoor star test rig for the 6 inch [15cm] and 10.5 inch [27cm]
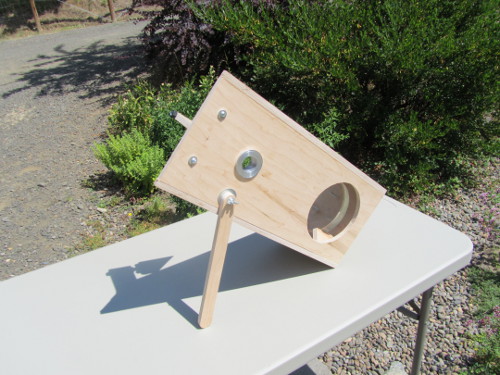
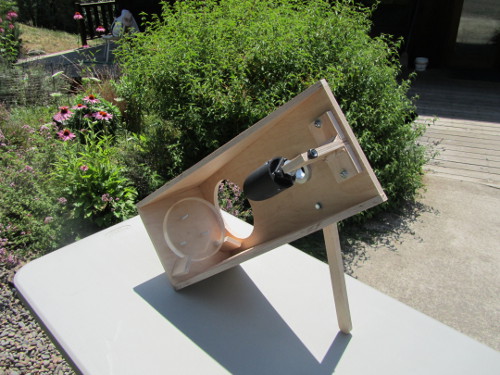
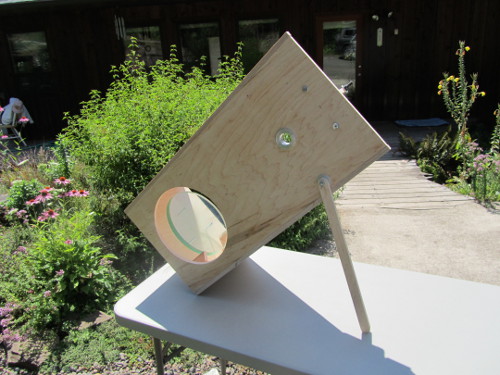
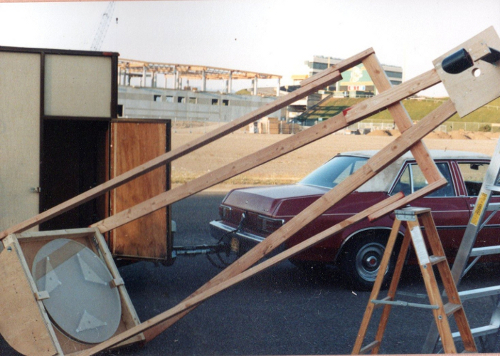
Here are images of my outdoor star test rig for the 13.2 inch [34cm] F/3.0
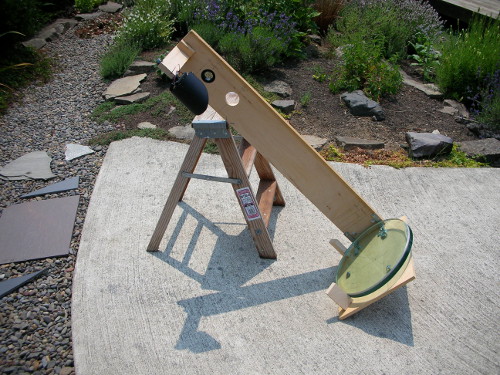
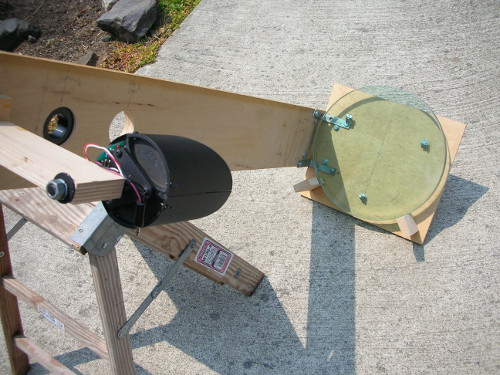
For those of us in the northern hemisphere, Polaris makes a perfect star test target. It's a good magnitude, not too bright and not too dim, easy to find, and almost motionless in the eyepiece. A simple holder that allows the high power eyepiece to be slid back and forth comparing the above/outside of focus and inside of focus discs of light is best.
Back of the envelope calculations suggest that a good elevation for the star test is loosely centered on 48 degrees. This angle incorporates seeing effects, portions of the sky at differing elevations, telescope and mirror cell imperfections and ignores the extreme horizon.
Here's the outdoor star test rig for my 30 inch [76cm].
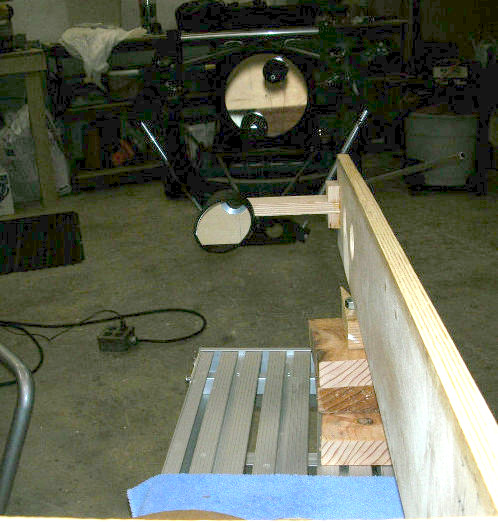
The indoor star test has the wonderful attribute of steady air in a controlled temperature room. However, it calls for a high quality larger aperture telescope. Difficult to discern here, but this image shows the 13 inch star test rig laid horizontally on a bench aimed at my 20.5 inch [52cm] F/5. The larger scope has illuminated pinholes placed at its focus. The smaller pinholes yield better star tests but are dimmer to see.
Every amateur can learn the star test. With it you can diagnose optical quality, optical alignment, telescope and atmospheric conditions, and be in a position to make improvements and understand how best to use the scope on a nightly basis as seeing changes.
Judging the star test takes time at the eyepiece under the stars. Any mirror, particularly large mirrors, can have multiple defects which confound the analysis. Then there are environmental factors that confuse the test such as the mirror mount, the mirror's instability in the cooling night air, local seeing at the telescope, bad seeing in the upper atmosphere, questions about the eyepiece and correcting lenses, and your eye. Judging the optics by using the star test takes a great deal of experience. How injurious is that defect? How about this other defect - does it matter?
Particularly tragically comedic is an amateur with no experience attempting a star test on a large scope. It's an unfolding disaster. Instead, learn the ins and outs of the star test on smaller mirrors. This is the best way to learn the subtleties of the star test. Small long focus mirrors tend to have fewer confounding defects, are more immune to seeing issues and can use simpler eyepieces. Scopes with 4 to 10 inches [10-25cm] aperture and a focal ratio of F/6-F/10 are ideal.
Star testing while figuring a smaller longer focal ratio mirror is quite instructive. You quickly learn how the mirror's defects as discerned by the star test affect the at-focus image. There is no such beast as a perfect mirror; every mirror will show some trivial defect or worse. The question you must learn to answer is what is the impact on the at-focus image?
A critical star test takes minutes to hours to separate mirror defects from seeing issues and other confounding factors, involves more than one high power eyepiece and needs to be executed on nights of good seeing. You may discover that you need to make adjustments to the telescope's optical alignment, active cooling scheme and focuser.
While it takes years to become an expert, spending time reading star tests while parabolizing mirrors and observing through a variety of telescopes, an expert can quickly judge a telescope. There is no better time than today to begin learning the test and no better time than tonight to start!
Think of it: every telescope that you test will fail the star test at some level from beyond trivial to serious disaster. From this viewpoint, the test is overly sensitive.
It’s a strawman argument to say that a wave rating of ‘x’ is required for the mirror or the cell yet in the same breath go on and say that it can’t be detected visually.
Conversely, refrain from attaching objective criteria to a star test result. Avoid loose talk like, "Oh, that mirror is easily 1/4 wave", or "Oh, that mirror is not diffraction limited". Maybe subsequent bench testing will bear out such a conclusion and maybe it won't. One can say, based on many star tests over the years, where a particular telescope falls in relation to other scopes.
Allow me to offer an unsolicited testimonial from well-known telescope maker and interferometrist Dale Eason. "A few years ago I met Mel in person for the first time at a Star Party in Wisconsin. We had communicated for years on the net. I had my 16 F/5 telescope whose mirror I made and knew very well from the interferometry data. The telescope itself was still a work in progress and I think the mirror was not yet coated. The telescope had no tracking and was very unstable. It jiggled when you toughed the eyepiece. Mel wanted to star test it so I let him. He did not know the interferometry data from it. He took about one minute and then he proceeded to describe its faults that I knew from interferometry and described their position on the mirror. That man can star test" --- Dale Eason
Did you know that Jean Texereau, master professional optician and author of the influential, "How to Make a Telescope", used the star test to re-figure the McDonald Observatory 82 inch telescope? He performed 17 figuring spells, star testing in the night after every daily spell. He lowered the wave rating from 1 wave to 1/8 wave.
While subjective, the star test is capable of revealing subtle spherical aberration, the most common optical defect, down to 1/50 wavefront, similar to other tests; zonal defects, turned edge and astigmatism similarly cannot hide. However, surface roughness that can affect lunar and planetary observing is harder to detect. For this, a companion test such as counting lunar craterlets in Plato, or looking for details on Jupiter's moons, should also be conducted to fully evaluate a telescope.
The telescope should be cooled to the night time temperature, be optically aligned (collimated) and tested on nights of good seeing. The test star should be accurately centered. Testing a star off center, or testing a scope not accurately aligned (collimated) or testing a scope that has not cooled to the night time air temperature can produce spurious results. Remember that the star test is a complete test that includes optics and telescope. Here, Jerry Oltion's mirror has cooled in the freezer, ready for star testing later in the cold winter night.

Star tests require a star that is at least halfway up the sky and that is not too bright. Bright stars and their scintillation dazzle and make testing problematic. For an un-aluminized mirror being parabolized, Polaris makes a good target for much of the northern hemisphere; otherwise pick a fainter star slightly above your pole. If picking a star elsewhere in the sky then a tracking scope is di rigor, otherwise off-center aberrations will distort the results.
Part of the star test judges how the light snaps to a pinpoint at focus. This should be conducted so that this pinpoint, actually a dot called the Airy disk, is resolvable, the Airy disk being the minimum sized dot that light can focus into because of the diffractive nature of light. The eye can resolve the Airy disk at 2mm exit pupil and star test issues can be seen very near focus with careful inspection. For a F6 telescope, this means a 12mm eyepiece. High powers make star testing issues more obvious. The highest power you are going to use with the telescope is best. If you cannot see a star test issue at your highest magnification, then it hardly matters what the star test says at a much higher magnification that you cannot obtain.
Be sure to verify any coma corrector settings too. A wrong setting introduces some spherical aberration.
Be aware that Maksutovs and some APOs optimize by balancing aberrations. This can leave higher order aberrations that don't affect the in-focus image but will cause a diagonal shadow breakout test to fail.
I always rotate my head back and forth to separate any visual effects from telescope effects. Surprisingly, I've had people report that stars are lines or have flares or that the stars are astigmatic. Rotating their heads revealed that the issues were in their eye.
Especially on fast optics, the eyepiece begins to play a critical role. The star should be exactly centered in the eyepiece to avoid eyepiece caused aberrations and the eyepiece should be well vetted so that it does not add spherical aberration or other defects on-axis. At F2.5 there are few eyepieces that don't have problems.
A lack of collimation can mimic bad optics. Many failed star tests are due to less than perfect collimation.
Focus to a point test ensures that the telescope will be diffraction limited and give pleasing high power views of stars. Diffraction limited here means that diffraction effects dominate the view compared to optical defects in the mirror. Pleasing views mean that the stars focus to a sharp point at high power.
In the 1800's Dawes determined empirically that the resolving power of a telescope is 4.6 arcseconds divided by the aperture in inches. A 6 inch [15cm] telescope can theoretically resolve 0.8 arcseconds, assuming two equally bright stars of apparent magnitude 6. Rayleigh determined theoretically that the resolving power is 5.5 arcseconds / aperture in inches. Of course, in a 6 inch telescope, we can see some objects that are narrower (though we can't resolve them) such as Saturn's Cassini division which is 0.5 arcseconds wide.
Since the eye resolves about two arcminutes, then we need to magnify a 6 inch telescope 120 arcseconds / 0.8 resolution limit =~ 150x. Generalizing, this is ~ 25x per inch of aperture. In metric, the required magnification is simply the aperture in millimeters (!)
If it is an f/8 telescope of 48 inches [120cm] focal length, then an eyepiece of 8mm will suffice to reach the telescope's resolution limit. Note the relationship between the focal ratio of f/8 and the eyepiece's focal length of 8mm. Using an eyepiece whose focal length in millimeters is the same number as the telescope's focal ratio yields the necessary magnification to reach the telescope's theoretical resolution.
To test that the telescope will give a pleasing high power view of stars and resolve to its theoretical resolution limit, in other words, that diffraction effects dominate the image, use an eyepiece equal to the focal ratio of the telescope, e.g., a 6mm eyepiece if f/6, a 4mm eyepiece if f/4.
Inspect the star image by sliding the high power eyepiece back and forth through focus very slowly. The star disc should shrink evenly into a bright point surrounded by blackness then expand again into a disc on the other side of focus. The slower the scope the greater the depth of focus where the star remains a tiny point. Do not confuse the depth of focus with light that never quite comes to focus.
This is sometimes called the 'snap focus test' today. If this is not the case, for instance, a bit of fuzz remains when the light comes to a bright point, the fuzz disappearing into the bright point as the eyepiece slides further along while the bright point begins to expand either into a fuzzy disc or a ring, then the mirror fails the test.
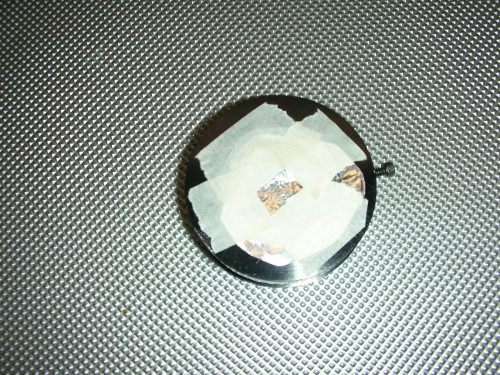
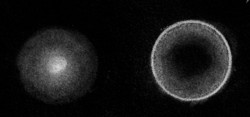
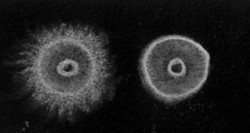
Here the image on the left is perfect, the image on the right is quite poor.

Focus means finding the eyepiece's location where the spot of light is tightest, sometimes called the circle of least confusion, or blur spot. This is the smallest circle that encompasses all the rays of light being reflected from the primary as they join together before they separate again. This is sometimes the geometric view or the ray trace view. However, once the light rays come together in a space that's a fraction of the wavelength of light, then diffraction effects occur.
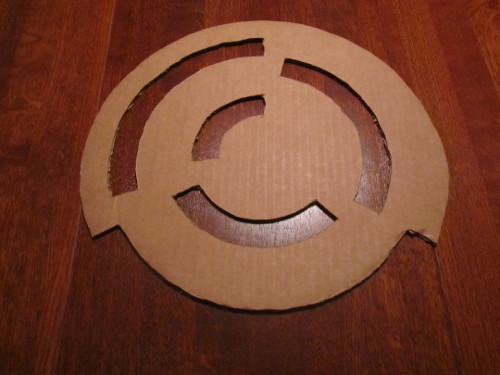
These effects manifest themselves, for circular apertures like telescope optics, as a disc of light surrounded by rings of decreasing brightness. You can see these effects vividly. Cut out a cardboard mask that covers the end of your telescope and make a one to two inch hole midway to the edge in it such that it avoids the diagonal and position it so that it avoids the spider vanes. Aim the scope at a very bright star. You can suspend a small circular black disc in the center of the hole, simulating the additional diffraction effects that the secondary diagonal causes. You'll see that once the diagonal shrinks to 1/5 the size of the opening that the diffraction effects are not noticeable.
These diffraction effects dominate the high power star image of a mirror accurate to quarter wave. A practically indistinguishable from perfect diffraction pattern occurs when the mirror can form an image accurate to an eighth of a wave. For our testing purposes, if the high power star can be focused to a bright spot then the mirror is likely quarter wave or better. By inspecting the distribution of light by defocusing the star image, we can test to very small fractions of a wavelength. Spherical aberration or overall correction can be tested to 1/20 wavefront, for instance, well beyond what is needed for a high quality mirror.
The performance check under the stars is all about local seeing or thermal disturbances in and near the telescope, seeing conditions in the upper atmosphere, optical alignment and pinched optics along with focuser operation. Since nothing can be done about the optical quality of the primary and secondary mirrors, this test is not concerned with the optical quality of the mirrors themselves.
Checking thermal disturbances in and near the telescope
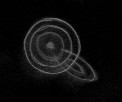
Checking seeing. There are two types of seeing to check for. The first is local seeing characterized by a chimney, flare or spike pattern and slow wavy undulations as if you are viewing from the bottom of a swimming pool. The last is high altitude seeing. Rack the focuser out so that you focus on the upper atmosphere. Look for very rapid parallel waves rippling through the star test pattern.
Checking optical alignment. When defocusing, the diagonal shadow is not centered. Be sure you do this test with the star precisely centered in the eyepiece. Defocus only a small distance otherwise the diagonal offset in very fast Newtonians may confuse the issue.
Checking focuser operation. There should be no play or change in optical alignment as well as no anomalous shadows or edges as the star is defocused in both directions. Check optical alignment with a laser collimator with the focuser racked well in and well out.
The star test is a combined end to end test. With experience one can learn to separate out the various issues. Here are some examples.
Checking pinched optics including slings. The defocused star test pattern will display flat edges and other weird discontinuities.
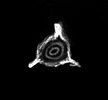
Particularly telling are three flares in the defocused star test pattern's outer ring, indicating that the mirror's edge is pinched at three points.
Bad secondary or bad secondary holder. I've rarely seen this but it can be puzzling because it is seldom suspected. Tell-tale signs include dramatic large scale errors like flares. Another clue is that astigmatism or pinching is aligned with the diagonal axis. Angles can be confusing at the eyepiece. Insert an obstruction like a piece of black cardboard in line with the diagonal to see the orientation during star testing.
Sling problems are aligned vertically and show up as differences between the upper part of the star test image and the lower section. Here is an example where the sling is pinching the mirror (perhaps it does not cover 180 degrees of the mirror's edge, or it has stretched with differential forces around the mirror's rim, or perhaps a thick sling is keeping the mirror's edge from cooling as fast as the mirror's uncovered top edge.
Focuser misalignment can be a headscratcher. One side of focus the secondary breakout looks centered but on the other side the secondary shadow is offset. How can this be? If the focuser axis is not squared onto the primary's center then the diagonal shadow will move from center to side.
Analyzing the primary mirror means separating deleterious effects from optical deficiencies. These deficiencies include turned edge, over and under correction (residual low order spherical aberration), zones, astigmatism and surface roughness.
Make sure you run the check for overall telescope performance that night under the stars and that you can account for every factor listed there. Otherwise the primary mirror quality check will be invalid.
John Dobson wrote in the Celestial Observer, 1973, published in San Diego, California, "The bright spot ... is thrown out of focus first one way then the other by pushing the eyepiece in and out. The two resulting discs of light should be the same. If they are not, the mirror needs to be dug in those areas that bundle too much light when the eyepiece is too far out."
Remember his simple words. He knows what he's talking about. I've star tested his 24 inch [61cm] f/6.5 mirror and it is very good. He won an optics award at the Riverside Telescope Makers Conference in 1971. He gave me confidence that the star test was a serious, discerning and demanding test. So I learned the art of star testing. The quality of the view through the eyepiece is subjective. Stirring in numbers like peak to valley wavefront rating, r.m.s. wave error and Strehl ratio confuse as much as they clarify. The beauty of the star test is that you get what you see. And it is all done with a simple high power eyepiece on a night of good seeing. I try to star test every telescope I look through. The experience of seeing hundreds of mirrors and their defects is invaluable. Every mirror will show errors or deviations in the star test, some greater that are injurious to the view, some hard to see and completely inconsequential.
It is a simple rule of thumb: rack the eyepiece outward. Those areas of the mirror that appear excessively bright or have bright rings need more polishing. Rack the eyepiece inward. Those areas of the mirror that appear excessively bright or have bright rings need less polishing. (Technically, the high zones need to be polished such that their slope or how they direct light is brought in line with the rest of the mirror.)
By the way, if you are testing a finished mirror, then do not worry excessively if it is under or over corrected. A deviation is a deviation. Of course if you are testing to finish parabolizing a mirror, then it is critical that you understand perfectly. Also, resist the temptation to gauge whether the deviations are tenth wave or quarter wave. It doesn't matter. A slight deviation has a small impact on the image and a very slight deviation essentially no impact. Serious deviations mean that the in-focus image is significantly compromised and not usable at high powers. Concentrate on the seriousness of the deviation. I recommend a thoughtful reserved style of thinking. Avoid loud, brash thinking and a rush to judgement. Set aside your initial impression and take the time to do a thorough star test. That means many back and forth eyepiece movements when deviations are slight. When you seek advice, listen to those who ask thoughtful questions so as to get a complete picture.
I've come across an interesting phenomenon. Each mirror maker has a characteristic star test. Mirror maker 'X's mirrors are recognizable and distinct from mirror maker 'Y'. Our personalities impact how we make mirrors. Our processes and techniques vary. That's because there are many variables in mirror making. Each mirror maker chooses to control some factors and vary others in order to achieve the desired result.
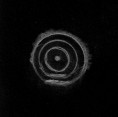
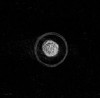
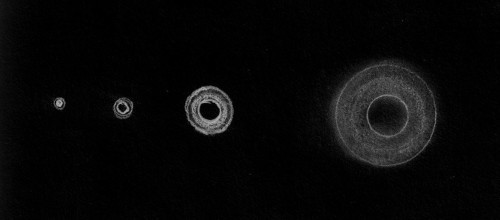
Slide or rack the focuser with a high power eyepiece giving 1-2mm exit pupil back and forth about 1/8th of an inch [3mm]. If the mirror is nearly perfect, you will see a bright ring emerge from the focused star image followed by an inner ring that is the diagonal shadow. Between these two bright rings are fainter thinner interference rings. As you slide the eyepiece further out of focus these rings turn into a smooth disc of light with a centered diagonal shadow.
A mirror that is not sufficiently parabolized is called undercorrected. A mirror that is overly parabolized is called overcorrected. A spherical mirror without any correction is gravely undercorrected.
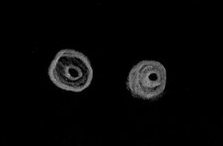
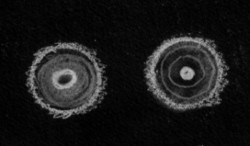
Here's what a mirror that is gravely undercorrected looks like as the eyepiece is moved from above focus (left hand side) to below focus (right hand side). A mirror grossly overcorrected looks the opposite where the eyepiece is moved from focused below (left hand side) to above focus (right hand side). Most importantly, the light does not focus to a single point; there is no focuser position that gives perfect focus; there is always some fuzzy light around the star.
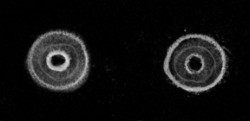
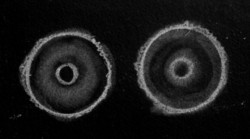
When the mirror is somewhat under or overcorrected then the diagonal shadow will break out at unequal distances on either side of focus. Here the diagonal is breaking out too soon in the left hand star test and is hardly breaking out at all in the right hand star test. If the diagonal breaks out quickly while moving inside of focus and the diagonal breaks out slowly while moving outward of focus then the mirror is undercorrected. Conversely the diagonal shadow breakout is slow below/inside of focus and quick above/outside of focus when the mirror is overcorrected. I've shown a touch of brightening around the diagonal breakout when it breaks out quickly and a touch of brightening inside the mirror's edge ring when the diagonal breaks out slowly. This indicates a great degree of under or over correction. If the diagonal is too small, then enlarge its shadow with a cardboard mask. A mask 1/3 the diameter of the primary is ideal.
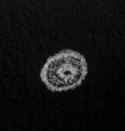
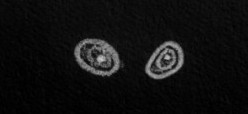
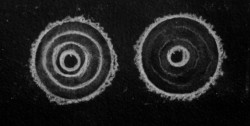
When undercorrection or overcorrection is very slight such that the diagonal shadow breakout is the same on either side of focus then the very slight under or overcorrection will be seen as a difference in brightness between the diagonal shadow ring and the mirror's edge ring. Note in the first image that the diagonal shadow ring is slightly brighter than the mirror's edge ring. If the first image occurs when the eyepiece is defocused outward slightly and the second image occurs when the eyepiece is defocused inward slightly then the mirror is slightly undercorrected. If the focus positions are reversed then the mirror is slightly overcorrected. At this point, the mirror is diffraction limited in that the diffraction effects due to the nature of light overwhelm the impact on the image of very slight under or over correction.
Remember that mirrors look overcorrected when cooling and undercorrected when warming up. Testing a mirror in the evening often results in an overcorrected test result. It's best to test after midnight in the early morning hours.
The diagonal breakout test as formalized by Suiter in his "Star Testing Astronomical Telescopes" book is predicated on a central obstruction of 1/3. The idea being that a breakout difference of 2:1 between one side of focus and the other is a 1/4 wavefront error. However, if the diagonal obstruction is smaller than this then the test is more sensitive than 1/4 wave. Further, the assumption is that the mirror's surface is smooth with a single error, that is, no zones.
Larger mirrors always have zones, making the diagonal breakout test for larger mirrors into a zone test: does any zone leak over into focusing slightly differently than the rest of the mirror?
Regardless of the mirror size, while small diagonals may help with high fidelity detail, they cause trouble in the star test particularly when testing for spherical aberration, the most common mirror defect. Central hills and depressions brighten and dim the diagonal shadow rim's ring, mimicking spherical aberration. When conducting tests on the impact of central obstruction, I saw that increasing the obstruction to about 1/3 the size of the primary mirror masked the central defects, allowing spherical aberration to shine through. A mask of 1/2 the primary hid too much of the mirror's central zones. I make a black cardboard mask, sticking it onto the diagonal holder's mounting bolt.
Analogous to the diagonal breakout test that uses the diagonal's circular obstruction to look for zonal differences, a single thick diagonal holding stalk that is 10% thick compared to the primary diameter works well to bring out issues. You can create a mask if need be, indeed a thick bar across the mirror's face will do nicely. You look for two issues: 1) the thickness of the shadow as you move the focuser back and forth across focus and 2) 'breakout' of portions of the stalk. Don't be fooled into thinking that these thickness and breakouts constitute the actual radii on the mirror. They inevitably appear closer to the mirror center. Best to use masks placed over the mirror's face to locate the zone.
Astigmatism (low order) manifests itself as you begin to defocus. The star has an oval shape that when you defocus in the other direction rotates 90 degrees. If bad, the star will focus to a short line, not to a point or dot. Causes in the order of likelihood: the optician figuring in astigmatism due to bad support or preferential area polishing; a mirror support like a sling; flexing due to wedge (one side of the mirror is a tad thinner than the other side); differential cooling. Bad glass (poorly annealed glass) is blamed more than it deserves. In vogue today is the idea that glass has a 'grain'. I've thought so once or twice but always it was traced to the true cause.
Turned edge (TDE stands for Turned Down Edge) causes a hairy ring inside of focus (left hand image) and a bright hard ring above/outside focus (right hand image). The edge zone curves downward, causing it to focus short or below. We call this an overcorrected edge because it is caused by overpolishing the edge or by polishing the rest of the mirror to a shorter focus.
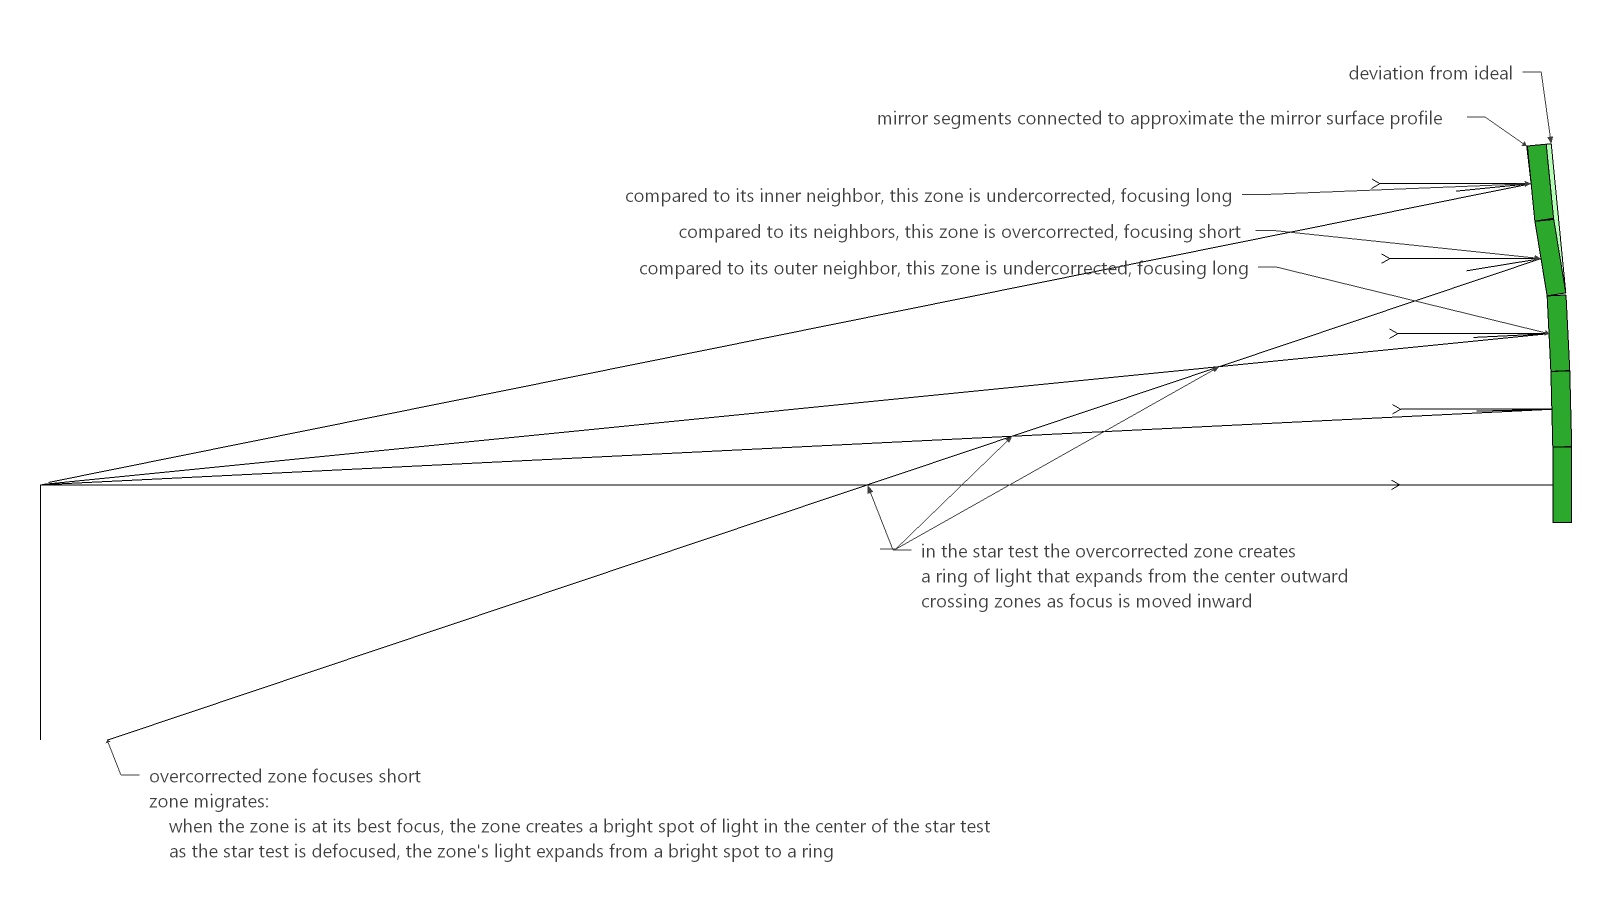
Particularly with larger or faster mirrors, zonal errors mix with correction errors. Let's analyze the case of an undercorrected 60-80% zone, a common occurrence. An overcorrected 60-80% zone, also common, will appear exactly the same except that the defocus directions are reversed.
The circle of least confusion occurs at line 'C', which if smaller than the Airy disk, diffraction effects dominate. If the circle of least confusion is much smaller than the Airy disc, then the mirror will perform excellently, if the circle of least confusion is close to the size of the Airy disc, then the mirror will perform adequately.
As we defocus outward, we notice a bright ring that quickly enlarges in diameter from the central star dot. At line 'B', the circle appears to implicate the mirror's 40% zone, but that is only because the zone's expansion lags.
Even at line 'A', the bright ring still does not quite reach the 60-80% zone. A difficult to discern telltale sign is the dark ring to its outside.
Defocusing inward to line 'D', a bright ring appears on the rim with a dark area inside it.
This gradually subsumes into a more uniform disk of light at line 'E'.
Note that the diagonal breakout shadow shown in red occurs late when defocusing outward indicating undercorrection; however, after additional defocus, the diagonal breakout shadow becomes approximately the same size at equal distances from best focus (positions 'B' and 'D') with a brightening of the ring surrounding the diagonal shadow above/outside of focus. This illustrates the impact of a mirror's under/over corrected zone on the diagonal breakout shadow.

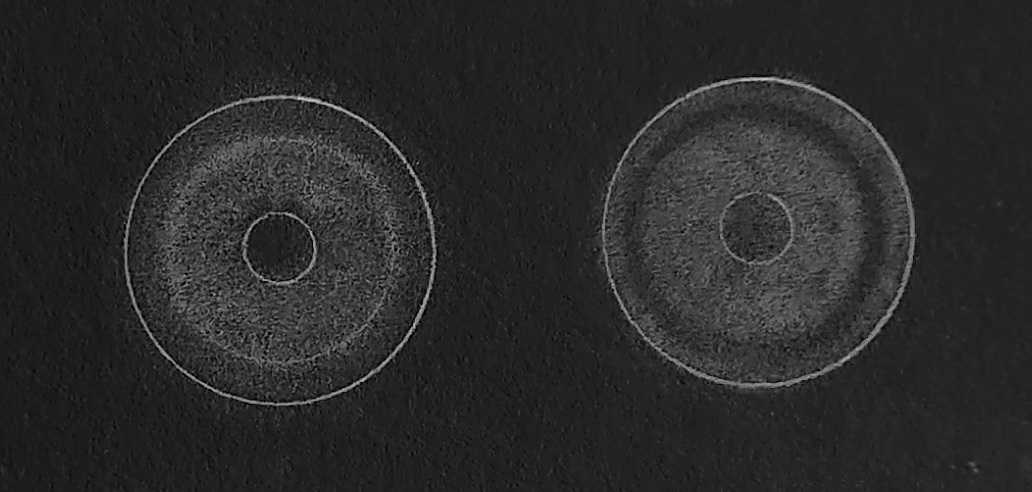
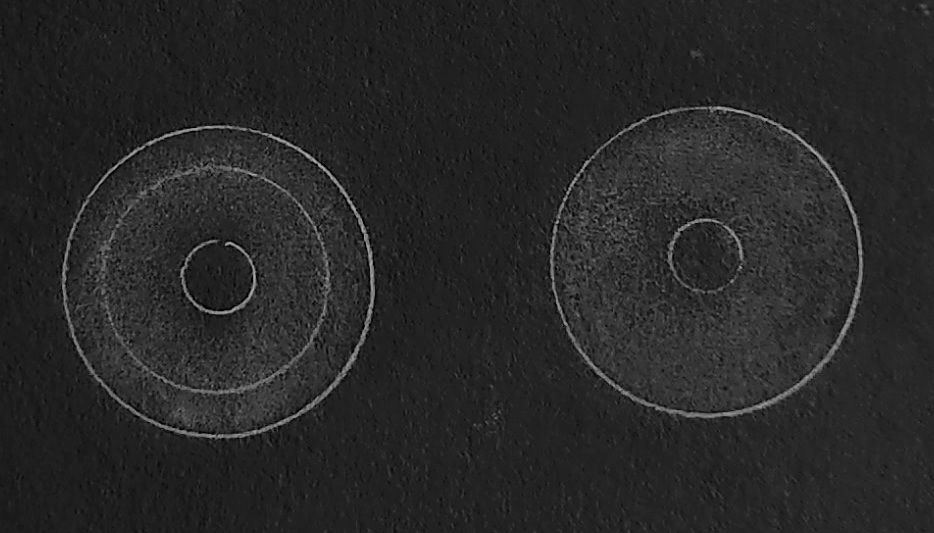
The first is what a slightly undercorrected (or overcorrected if the defocus positions are reversed) 60-80% zone star test looks like. The star is barely defocused. This mirror is very good.
Worse undercorrection/overcorrected in the 60-80% zone looks like this star test. Note the larger defocus when under/over corrected zone is worse. This mirror is fair.
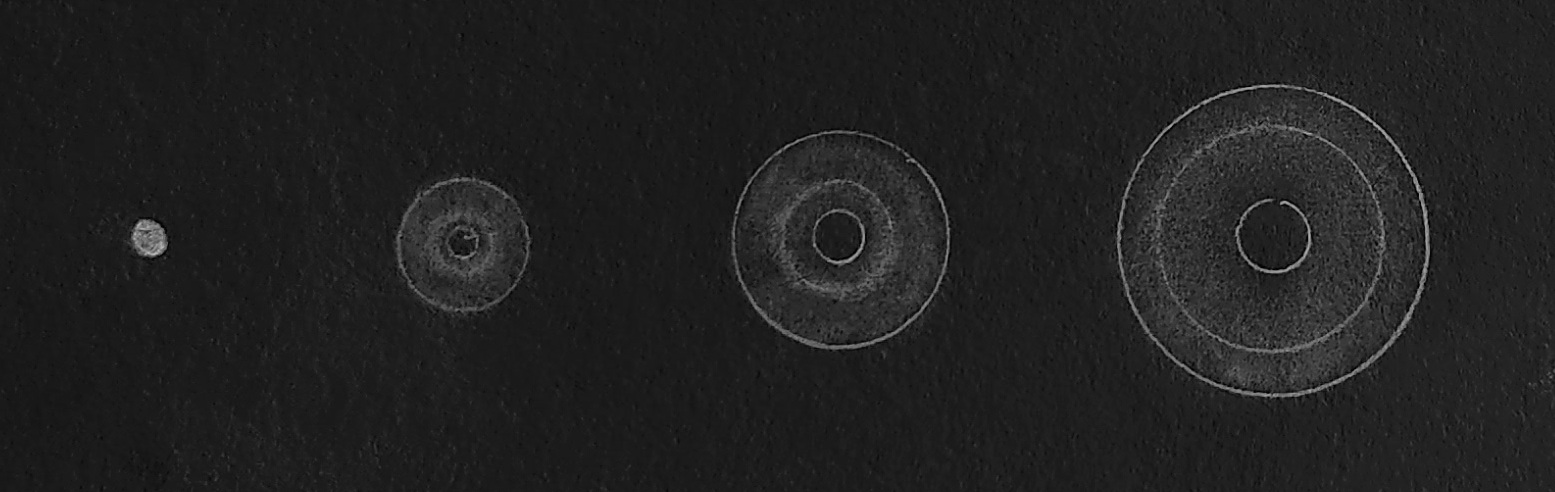
Contrary to common belief, it is possible to determine a zone's location on the mirror, as long as there are no other errors that confuse the star test. Let's take the case of an undercorrected 60-80% zone. As the star is defocused outward, a bright ring will appear at the edge of the diagonal shadow. As defocusing continues, the ring will propagate outward and dim slightly. As defocusing outward becomes extreme, taking up a good portion of the eyepiece's field, the ring will widen and dim, settling into position, revealing the location of the zone. Defocusing inward will show the opposite - a dark zone that expands and settles into position. As the zone becomes more modest, it becomes more challenging to discern its position on the mirror's face, hence the ZUP - Zonal Uncertainty Principle). A good way to overcome this is to use a mask in the shape of a narrow curved arc, experimenting with placing this on the mirror's face while conducting the star test. The arc marks the zone on the mirror when the zone disappears in the star test.
As the star test is used at every smaller exit pupils and higher powers approaching 50x per inch of aperture (2x per millimeter), the star test becomes more difficult as zones come into play. Zones that were subtly off and not noticed in coarser star tests now make their appearance as the star test is conducted closer to perfect focus where diffraction effects dominate. Zones cause the diagonal breakout ring to be brighter on one side of the star test. Masks to cover parts of the mirror can help tease out the offending zone.
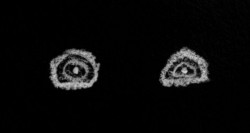
A zone appears as a bright ring on on side of focus with a corresponding dark ring on other side of focus. Note how the zone moves from center to edge as the star image is defocused.
In large fast mirrors, a minor zone is acceptable. Note that their is no noticeable dark ring on the other side of focus indicating that the zonal deviation is slight.
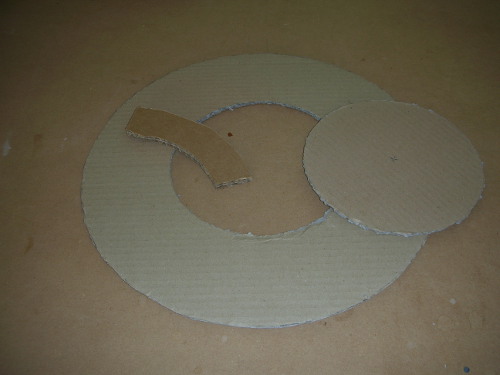
How can we tell what zone is under or overcorrected? There are two approaches. The first uses cardboard masks placed over the mirror to isolate zones and the second uses the Ronchi test with close inspection of the bands to see where they curve too much and where they curve too little. Here are masks that I used for the 13.2 inch [34cm] f/3.0 mirror. I've found that two masks are sufficient, sized half the mirror's diameter so that the masks stop and start at the mirror's 50% zone. Avoid too small of a mask like a 25% mask because the center's focus becomes too difficult to resolve since the effective aperture is stopped down too much. By using one mask then the other, I can isolate the under/overcorrected zone to inside the 50% zone or outside the 50% zone. In my experience and observing others, the 70% zone is hardest to correct properly. The small central mask shows a problem in the star test whereas the outer ring mask shows no problem. The smaller curved segment helped isolate a particular narrow overcorrected zone. I varied its placement on the mirror until differences in the above/outside and below/inside star test image disappeared behind the segment. I did not use the more elaborate second mask very much. Incidentally this version of the star test is mentioned in Taylor's book of 1891, "The Adjustment and Testing of Telescope Objectives". Taylor viewed the star test as the best and most discriminating test for diffraction limited optics.
Important clue: when the hint of under or over correction becomes difficult to map to the mirror's surface, then the mirror is diffraction limited - you have left the geometric world. At this point there is real value in the mirror; risk aversion awakes in the guise of, "Should I risk ruining the parabolization for a slight gain?" The optician will be executing corrective polishing spells for only 30 seconds to a couple of minutes. I recommend continuing in order to learn how to make zonal improvements without hurting nearby zones. Eventually the zones will feel like wiggly Jello; you have reached the limits of your skills, glass and testing setup.
Surface roughness is difficult to see in the star test. It is best to have a high quality scope for comparison. The slightly defocused star image will have sharper interference rings between the diagonal breakout shadow and the mirror's edge ring. Also there will be no fuzz off the outer ring or interior to the inner ring. It is best to test for surface roughness using a Ronchi or knife-edge tester where the entire mirror's surface can be seen at once.
A smooth surface is a product mostly of technique: smooth even strokes of constant pressure using a large lap with a microfaceted, not channeled, surface and starred or scalloped edges. Premium polishing compounds can help sometimes but cannot make up for poor technique or too small of lap run for too long.
The Airy disk and surrounding rings are caused by interference effects thanks to the mirror's round aperture. Think of the classic slit experiment where the projected image is a series of slits diminishing in brightness from the central slit. Replace the slit with a round aperture and you have the Airy disk and rings.
The linear size of the Airy disc is solely dependent on the optic's focal ratio. An F10's Airy disc is ~ 0.0005 inches [0.13mm], whereas an F3's disk size is ~0.00016 inches [0.004mm]. This is true regardless of aperture, for example, a 100 inch F3 has the same Airy disc size as a 1 inch F3. What does change is that that 100 inch F3 has a hundred times more image scale so the Airy disc as measured against the sky is 1/100 the angular size, for example, the 1 inch F3's Airy disc is about 10 arc-seconds in diameter whereas for the 100 inch the Airy disc's angular size is 1/10 of an arc-second!
Star testing ever faster telescopes means that ever shorter eyepieces are required to obtain enough magnification to make the star best useful. Ever faster scopes also have a smaller Airy disc that the light should pass through (though we know thanks to interference effects the light won't go exactly where the geometric ray trace indicates).
Consider a F2.5 scope compared to a F4. The star test can look quite good when that F2.5 is stopped down to F4 because the Airy disc is now larger. Those same rays that easily pass through the F4's Airy disc may have trouble passing through a F2.5's smaller Airy disc. Some of the very best star test results I've ever seen have been with large fast mirrors stopped down in order to test their central areas!
It is a low-tech, zero-cost, easy to conduct test that can be done with any optical system. Insert high power eyepiece and center up a star.
It is an extremely demanding test, so go easy when you see defects that are not outrageous.